
Roofing 101 · Under the Shingles
Roof Deck, Underlayment and Leak Barrier: The Layers Under Your Shingles
Shingles get the attention, but three layers under them decide whether a roof holds. The deck is the wood everything is nailed to. The underlayment is the sheet that keeps water off that wood. The leak barrier is the self-sealing membrane at the places water gathers. Once a new roof is on, you will never see any of them again, so this is what each one is, what the code and the manufacturers require, and what to ask before they are covered.
Updated September 10, 2026
The System
The three layers under every shingle
Wood to nail to, a sheet to keep it dry, a membrane where water gathers
A shingle roof is built in layers, and the shingles are only the top one. Under them sits the underlayment, a sheet rolled across the whole roof. Under that is the deck, the wood panels nailed across the rafters. In the places where water collects or finds a way in, a third layer called leak barrier goes down first. Each layer has its own job, and a roof is only as good as the weakest of the three.
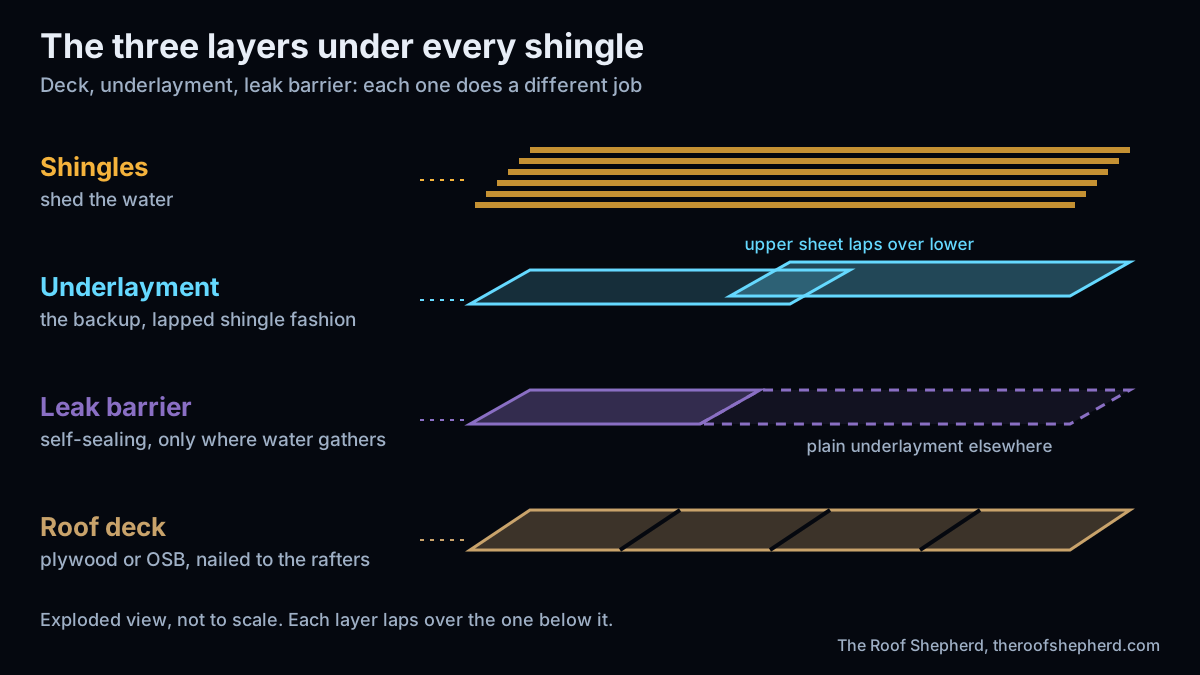
The shingles shed water. The underlayment is the backup: if wind lifts a shingle or hail cracks one, the underlayment is what keeps rain off the wood until the shingle is fixed. The leak barrier is a thicker, sticky membrane that seals itself around every nail driven through it, so it holds where plain underlayment would let water past. The deck holds everything and gives the nails something to grip.
All three are covered for good the day the shingles go on. That is why this page matters more than it looks: the only time anyone can see them is between tear-off and the first bundle, and the best evidence they were done right is what was checked and photographed in that window.
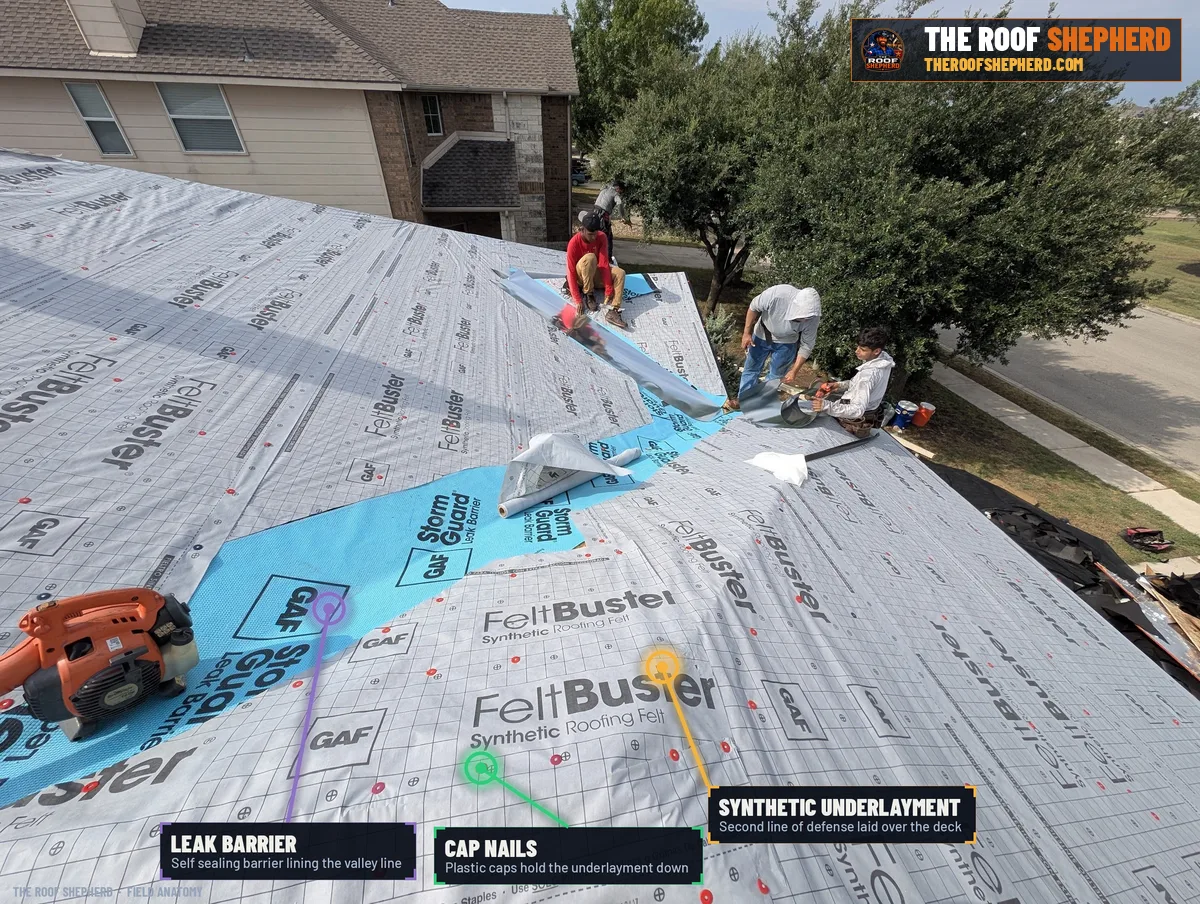
2021 IRC R905.1.1 requires underlayment under asphalt shingles conforming to the standards the code lists (a product with an evaluation report, such as the synthetics below, is accepted through the code's approval route for alternative materials), and R905.2.1 requires the shingles to be fastened to a solidly sheathed deck.
The Wood
The roof deck: plywood or OSB
The panels every nail on the roof depends on
The deck, also called sheathing, is the layer of wood panels nailed to the rafters or trusses. It is either OSB, oriented strand board, made of wood strands pressed and glued into 4 by 8 sheets, or plywood, made of thin wood layers glued with the grain crossed. Some older homes have boards laid side by side instead. All of it does the same job: it spreads the weight of the roof and the people working on it across the framing, and it holds every shingle nail.
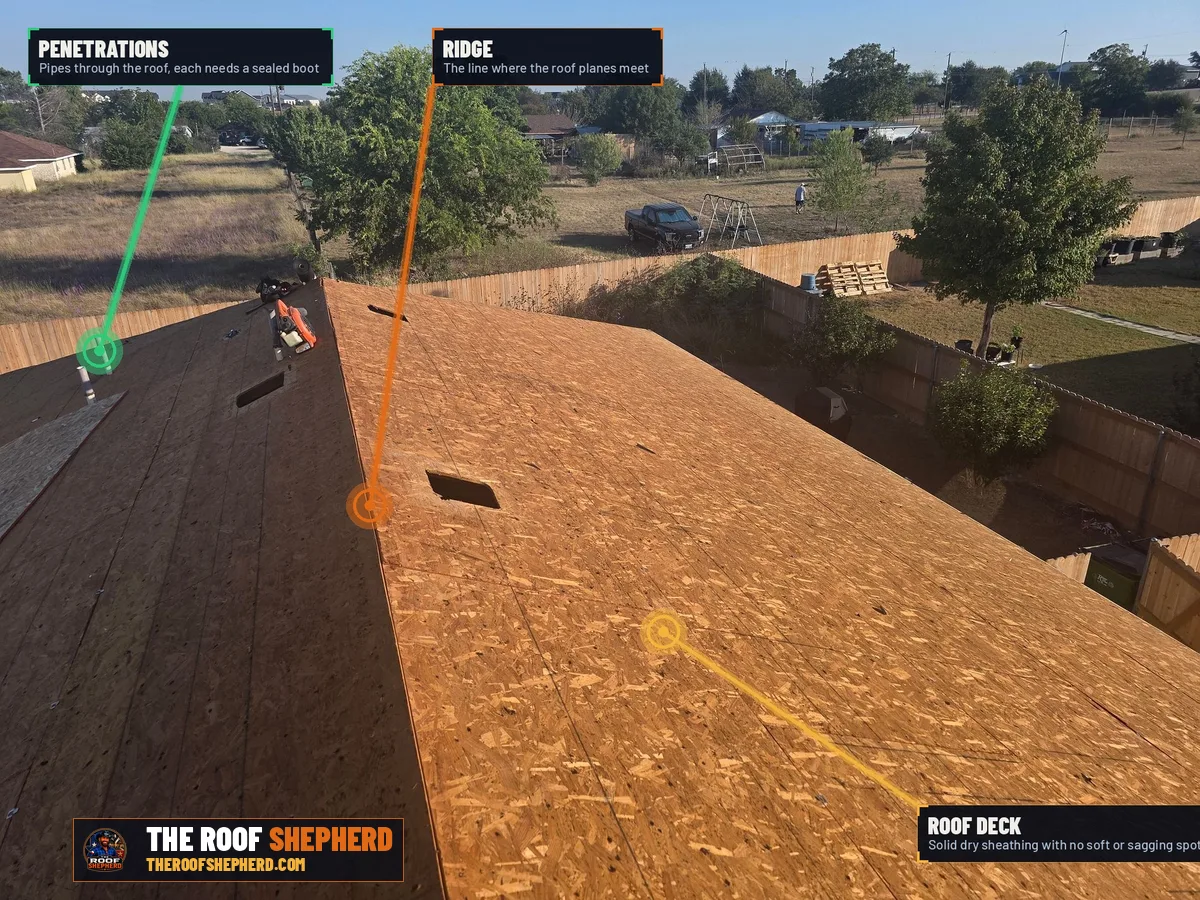
Plywood and OSB both work when they are the right thickness, dry, and fastened correctly. Neither one is meant to sit exposed to weather, which is the whole reason the underlayment above it exists and the reason the product instructions later on this page care so much about a dry deck.
Every panel should carry a stamp showing its grade and the standard it meets. The stamp also shows a span rating, which tells the installer how far apart the framing can be for that panel. Matching that rating to the framing under the panel is the installer's job, and the stamp is how anyone can check it.
GAF TAB-R-101 (06/26/2025): shingles go over minimum 3/8 in exterior-rated plywood complying with PS-1 or PS-2, or OSB complying with PS-2. APA recommends installing panels with any non-skid surface facing up.
The Check
How thick, how tight and how sound a deck has to be
Three questions to answer before anything covers the wood
Thickness first. GAF sets its minimum at 3/8 inch exterior-rated plywood or OSB in its substrate bulletin. The Insurance Institute for Business and Home Safety requires 7/16 inch roof sheathing for a home to earn a FORTIFIED designation under its 2025 FORTIFIED Home Standard. A 7/16 inch panel clears both, but a deck on an older home should be measured, not assumed.
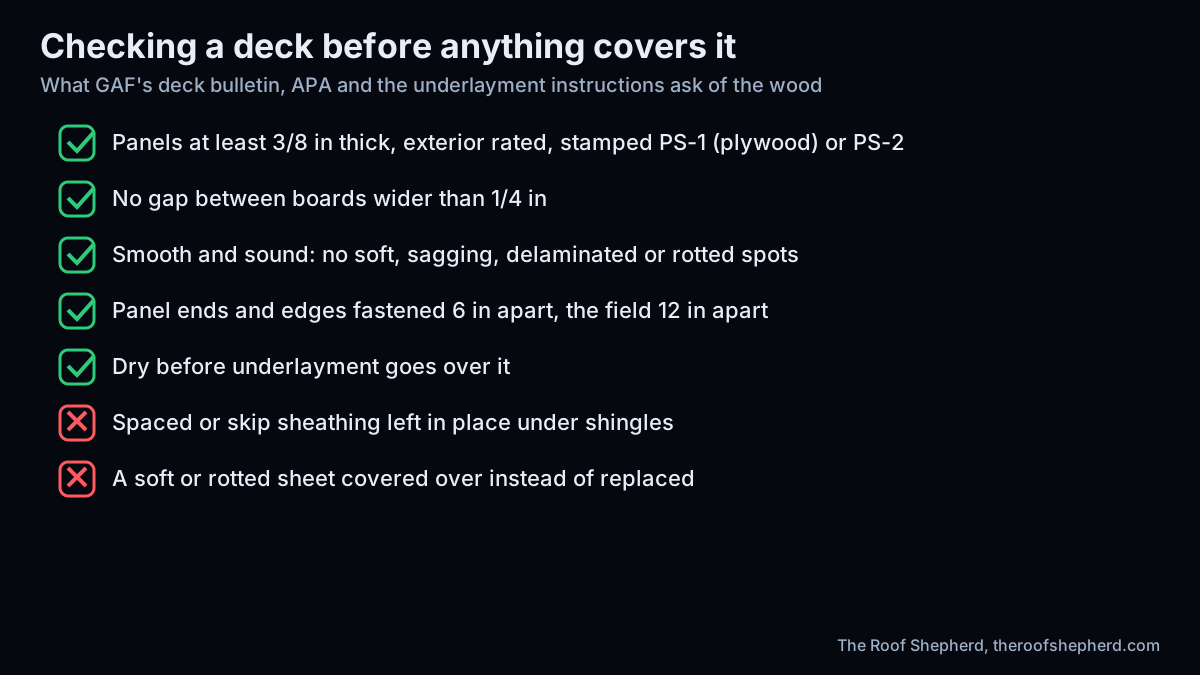
Then gaps. The same bulletin says there should be no gap between deck boards wider than 1/4 inch, and GAF does not recommend installing shingles over spaced or skip sheathing, the boards with open spaces between them that some older homes have. The code also requires asphalt shingles to be fastened to a solidly sheathed deck (R905.2.1), so spaced boards need solid sheathing before a shingle roof goes on.
Then soundness. A deck has to be smooth and solid. Soft spots that give underfoot, panels that have come apart in layers, dark rotted wood around an old leak, and sagging between rafters all mean a sheet has to come out.
GAF TAB-R-101: the deck must provide a smooth and sound substrate with no gaps between deck boards greater than 1/4 in; GAF does not recommend installation over existing spaced or skip sheathing.
The Fasteners
How a new deck panel is fastened
Closer at the edges, a little room between panels
When a sheet of decking is replaced, how it is nailed matters as much as the sheet. APA, the engineered wood association, recommends at least 8d common nails, 6 inches apart where the ends and edges of the panel sit on framing, and 12 inches apart at the framing in between. Each nail goes 3/8 inch in from the panel end or edge.
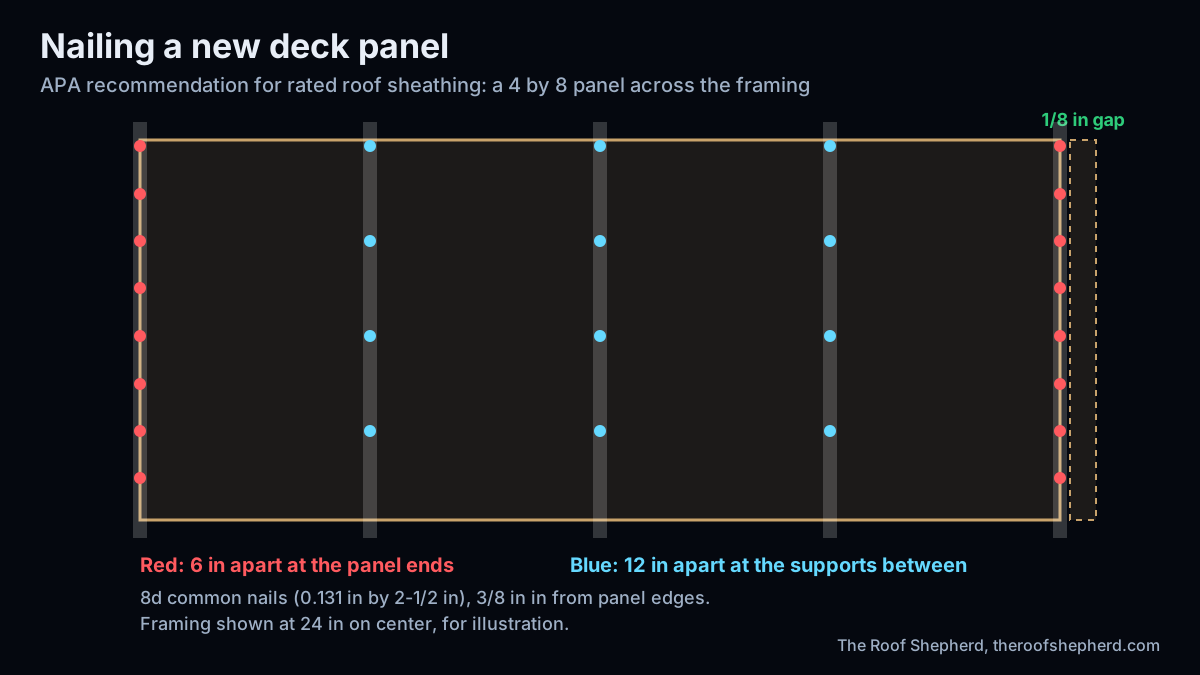
APA also recommends a 1/8 inch space between panels at every end and edge. Wood grows when it is damp and shrinks when it dries. The gap gives the panels room to move.
Some panels need clips between the framing to support their edges, depending on how the panel's span rating compares with the actual framing spacing. That is a code and engineering question for the specific roof, not a rule of thumb, and it is one more reason the stamp on the panel should match the framing it sits on.
APA Builder Tips N335: minimum 8d common (0.131 in by 2-1/2 in) nails at a maximum of 6 in on center at supported panel ends and edges and 12 in at intermediate supports, 3/8 in from ends and edges; 1/8 in spacing at panel end and edge joints unless the manufacturer says otherwise; edge clips per code where the span rating requires them.
At Tear-Off
When deck sheets get replaced, and why nobody knows the count ahead of time
The one part of a roof that is priced after the old roof comes off
Nobody can see a roof deck until the old shingles and underlayment are torn off. From the attic you can find some problems, like staining around an old leak or daylight where it should not be, but you cannot see the top surface or feel a soft spot. That is why a clear estimate treats decking as an allowance: a set number of sheets included, and a stated price for each sheet beyond that.
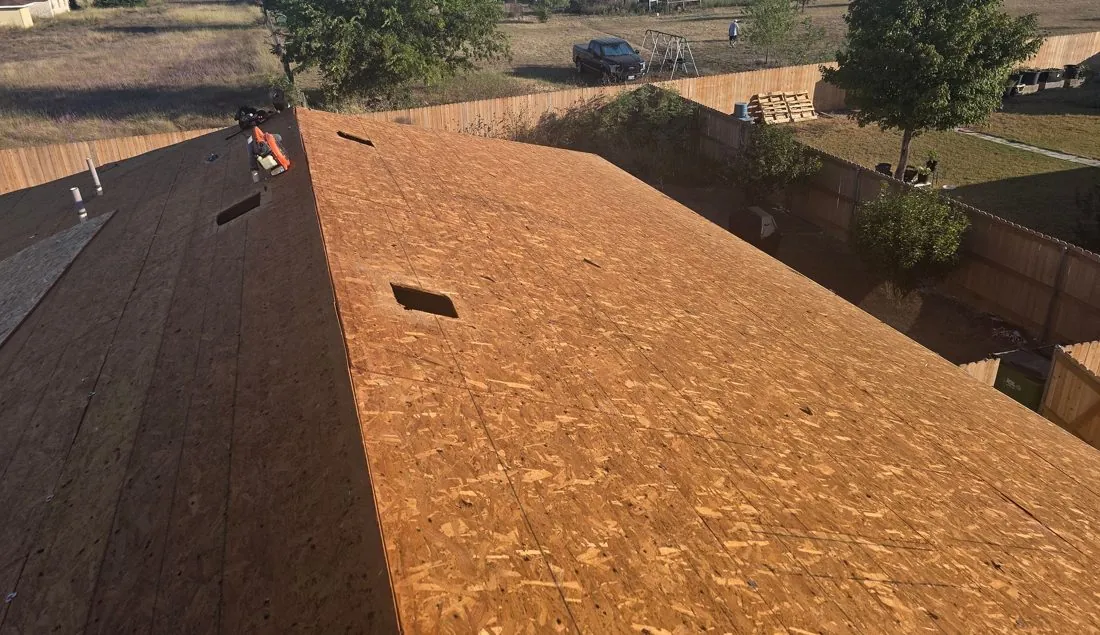
Sheets come out for the reasons in the check above: rot from a long-running leak, delamination, soft spots, and damage around old penetrations that were cut, patched and cut again. The places to look hardest are valleys, around chimneys and vent pipes, and along the eaves where water has sat.
Ask for photographs of every sheet that is replaced, taken before the new one goes in, and a count on the final invoice that matches them. A deck allowance with no photos is a line you have to take on faith, and an estimate that is silent about decking leaves both the count and the price of each extra sheet to a change order after the old roof is off.
Decking is priced per 4 by 8 sheet as its own line; the estimate should state how many sheets are included and the price for each additional sheet. See the estimate anatomy page for how allowances are written.
The Backup
Underlayment: felt and synthetic, and what the code accepts
Both keep water off the deck; they do not age the same way
Underlayment comes in two families. Felt is the traditional one: a paper or fiberglass mat soaked in asphalt, commonly called 15 pound and 30 pound felt. Synthetic is a woven or spun plastic sheet. Both shed water.
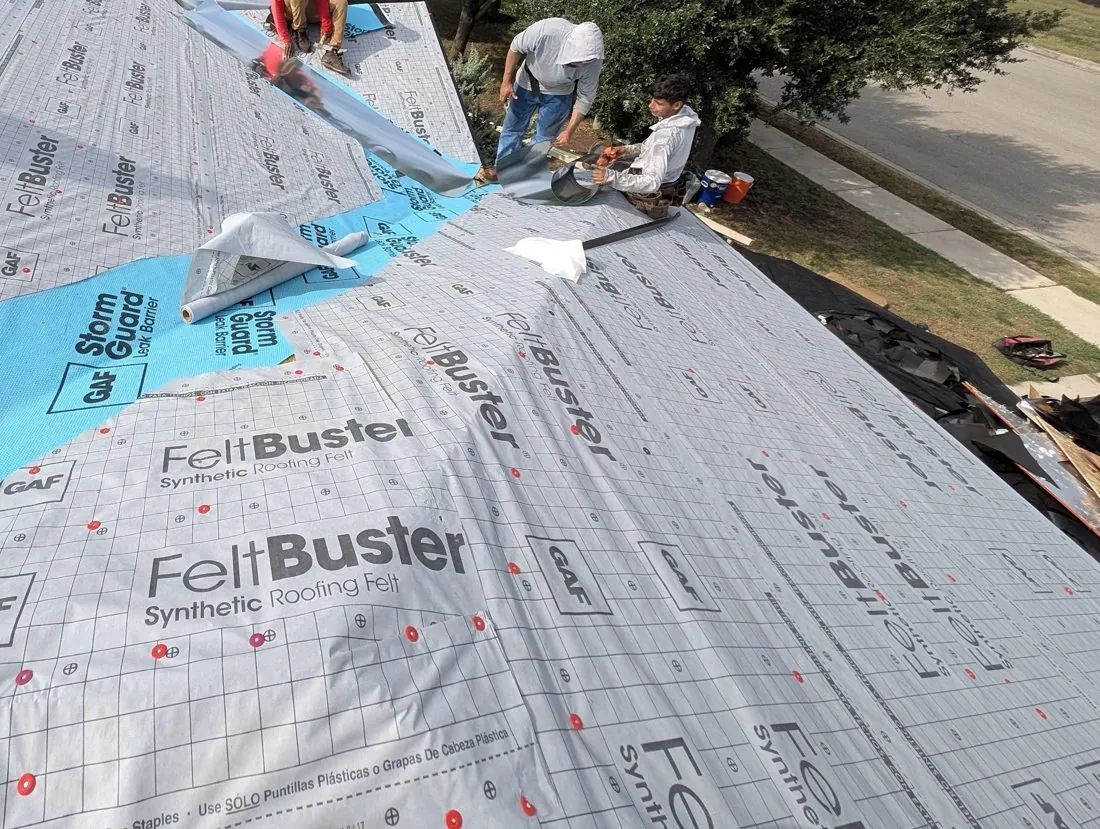
The code names the felts directly. The 2021 IRC lists underlayments that meet ASTM D226 (the 15 and 30 pound felts), ASTM D4869, or ASTM D6757 for asphalt shingles. A synthetic is accepted a different way: its maker has it evaluated against those felts under an acceptance criteria, and a code evaluation report says it can be used in their place. GAF's FeltBuster, the synthetic in several photos on this page, is one example, listed as an alternative to D226 and D4869 felts in ICC-ES report ESR-2808.
The practical differences are in the instructions each product carries: how it is fastened, how far each sheet laps the next, and how long it can be left before shingles cover it. FeltBuster's limit, for example, is 90 days. Neither kind is a roof on its own.
2021 IRC Table R905.1.1(1), asphalt shingles where wind design is not required: ASTM D226 Type I or II, ASTM D4869 Type I, II, III or IV, or ASTM D6757. ICC-ES ESR-2808 (reissued July 2026, AC188): GAF Deck-Armor, Tiger Paw and FeltBuster as alternatives to D226 and D4869 underlayments.
The Code Rule
How much underlayment the code requires, by roof slope
The flatter the roof, the slower the water, the more underlayment it needs
Roof slope is written as rise over run: a 6:12 roof rises 6 inches for every 12 inches it runs. It matters here because water runs off a steep roof fast and sits longer on a shallow one, where wind can push it uphill under the shingles. The code responds to that directly.
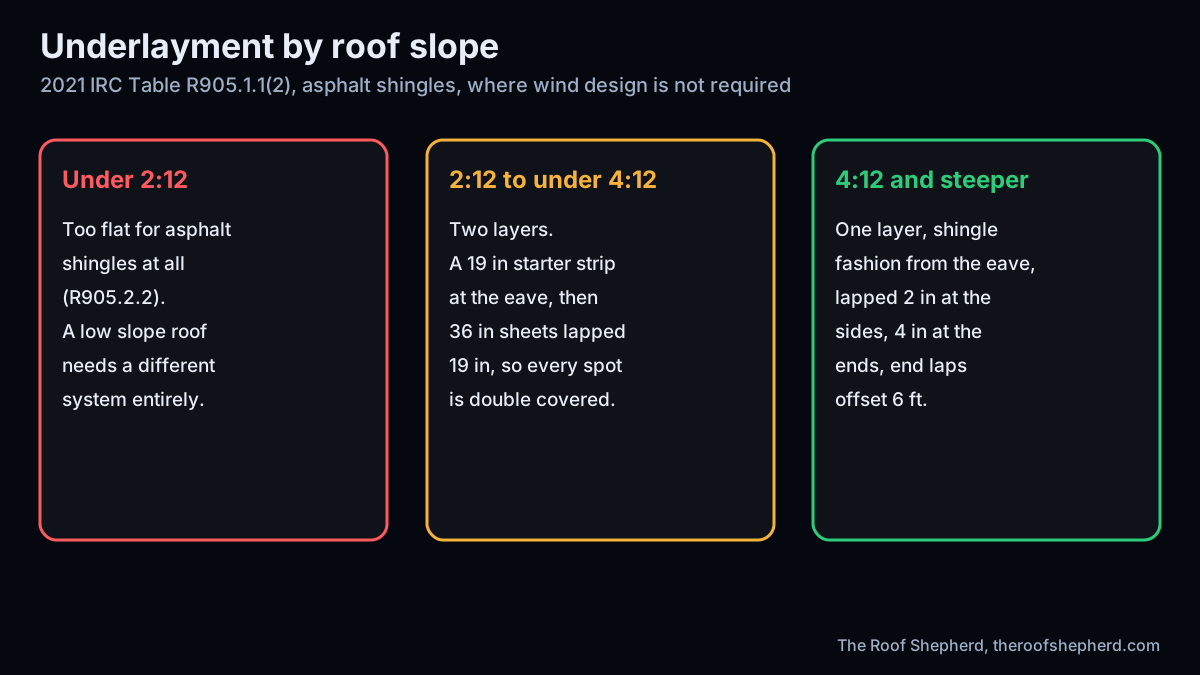
Asphalt shingles are not allowed on roofs flatter than 2:12 at all. From 2:12 up to 4:12 the 2021 IRC requires two layers of underlayment: a 19 inch strip along the eave, then 36 inch sheets each lapped 19 inches over the one below, which puts two thicknesses everywhere. At 4:12 and steeper a single layer is enough, rolled out shingle fashion from the eave with 2 inch side laps and 4 inch end laps, and the end laps offset 6 feet from one course to the next.
Two cautions. First, some homes have more than one slope: a steep main roof with a shallow porch or addition tied into it. The shallow part gets the two layer treatment even when the rest of the roof does not. Second, the numbers above are from the 2021 IRC, and a permit office works from the code edition its city adopted. Austin, for one, adopted the 2024 IRC in 2025. The product instructions carry their own numbers too, as the next section shows.
2021 IRC R905.2.2: asphalt shingles only on slopes of 2:12 or greater. Table R905.1.1(2): 2:12 to <4:12, a 19 in strip parallel to the eave then 36 in sheets lapped 19 in; 4:12 and greater, one layer shingle fashion lapped 2 in, end laps 4 in offset 6 ft. Wind-design areas carry additional requirements.
The Instructions
Laps and fasteners: what the product instructions add to the code
Plastic cap nails on synthetic, and laps that differ from the code table
Look at a roll of synthetic underlayment and you will find the rules printed on it. GAF's FeltBuster instructions call for 3 inch side laps and 6 inch end laps, with end laps staggered 3 feet apart. The laps are wider than the 2 and 4 inches in the code table, but the code staggers end laps 6 feet, farther than 3. ICC-ES report ESR-2808, which accepts FeltBuster in place of felt, says installation must comply with the code, the report and GAF's instructions, so where the numbers differ, ask which ones the crew is working to. On a shallow roof between 2:12 and 4:12 they call for double coverage by lapping each sheet over the one below by 25.5 inches.
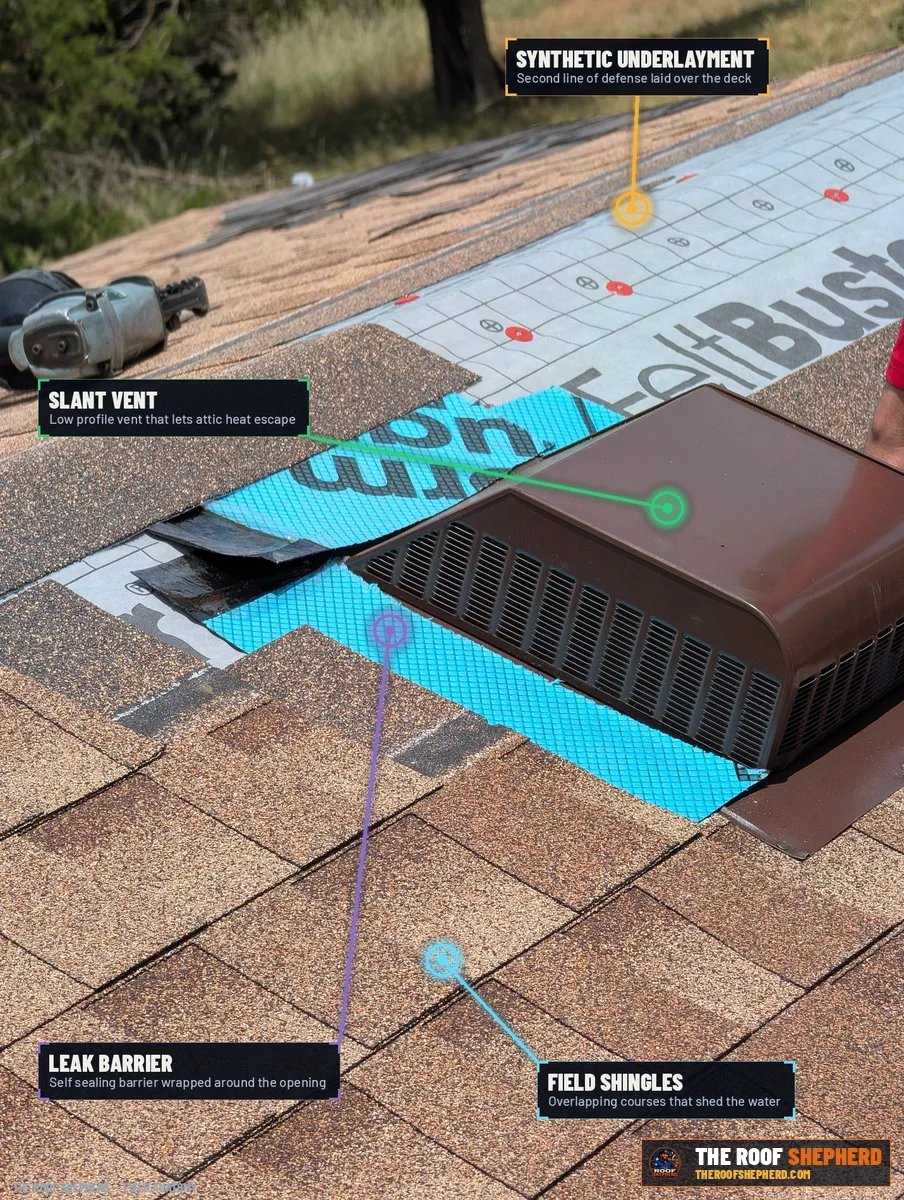
The fasteners are specific too. The same instructions say to use only plastic cap nails or staples with plastic caps, driven at least 3/4 inch into the wood or through the panel, 12 inches apart along the laps and in two staggered rows 24 inches apart through the middle of each sheet. Bare staples are not on that list, and a sheet that tears loose is no longer a backup for anything.
Plastic caps under the shingles are fine and normal. They sit covered by the roof, out of the sun, and they spread the hold of each nail over a wider patch of the sheet. The fasteners to worry about are the ones that are missing, spaced too far apart, or bare where a cap belongs.
GAF FeltBuster installation instructions: side laps 3 in (6 in for extra protection), end laps 6 in offset 3 ft; plastic cap nails or plastic cap staples only, penetrating 3/4 in into wood or through the deck; 12 in on center at laps and two staggered field rows 24 in on center (6 in and 12 in in high wind areas); minimum slope 2:12.
The Seal
Leak barrier: where it goes on a Central Texas roof
Valleys and penetrations first, eaves where the city or the manufacturer calls for it
Leak barrier, often called ice and water shield after one brand, is a rubbery asphalt membrane with a sticky back. It bonds to the deck and seals around the shank of every nail driven through it, which ordinary underlayment cannot do. That makes it the right material wherever water concentrates or has a way in.
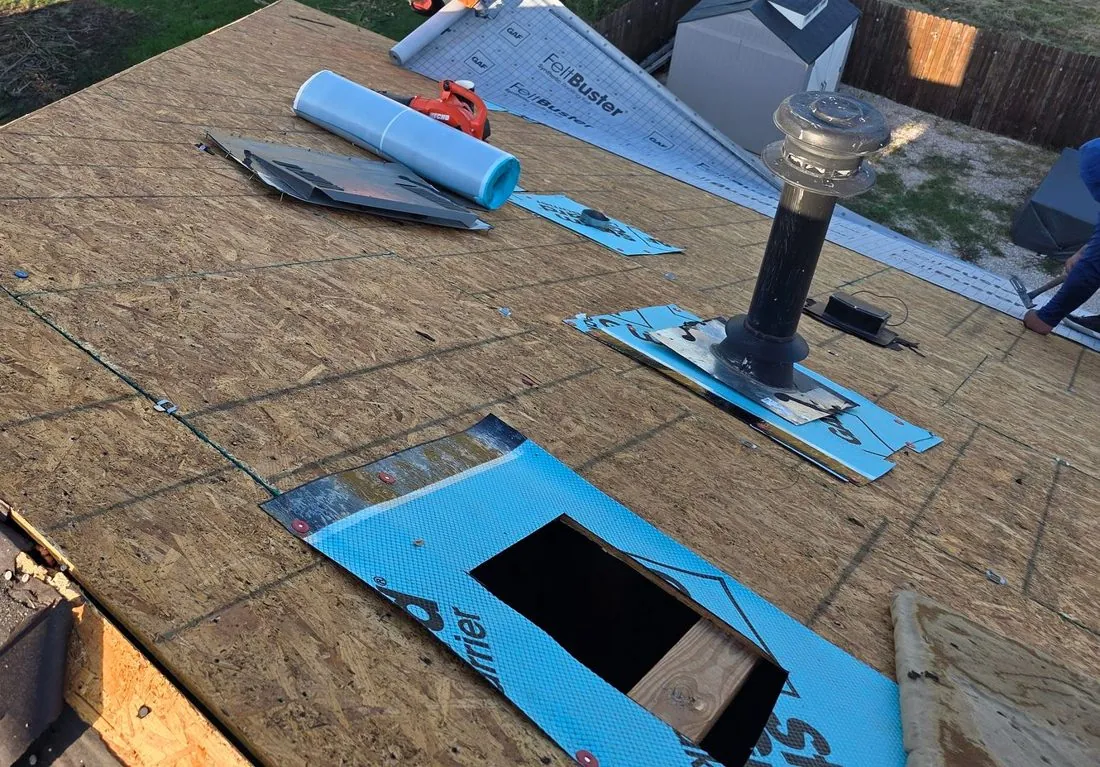
On a Central Texas roof that means the valleys, where two roof planes pour their water into one line, and around every penetration: plumbing vents, exhaust vents, skylights, chimneys, and the joints where a roof meets a wall. Those are the places water concentrates or has a way in, which is the job leak barrier is made for.
Eaves are a different question here. The code requires an ice barrier at the eaves only where a jurisdiction has a history of ice dams, as marked in its own code tables. The City of Austin's adopted table says it is not required, and the City of Georgetown says the same. For other Central Texas cities it is very likely not required but has not been confirmed from each city's own table. Where it is installed at the eaves in Austin or Georgetown, it is an upgrade, not a code requirement.
2021 IRC R905.1.2: an ice barrier is required where there has been a history of ice forming along the eaves causing a backup of water, as designated in Table R301.2; detached accessory structures without conditioned floor area are exempt. Austin's adopted Table R301.2 reads not required; Georgetown states not required.
The Sequence
The order the layers go on, and the details that decide a leak
Everything laps downhill, and the edges swap order at the rakes
The rule that governs every layer is the same one that governs shingles: the piece above laps over the piece below, so water running down the roof always lands on top of the next layer, never behind it. Get that order backwards at any seam and water is steered under the roof instead of off it.
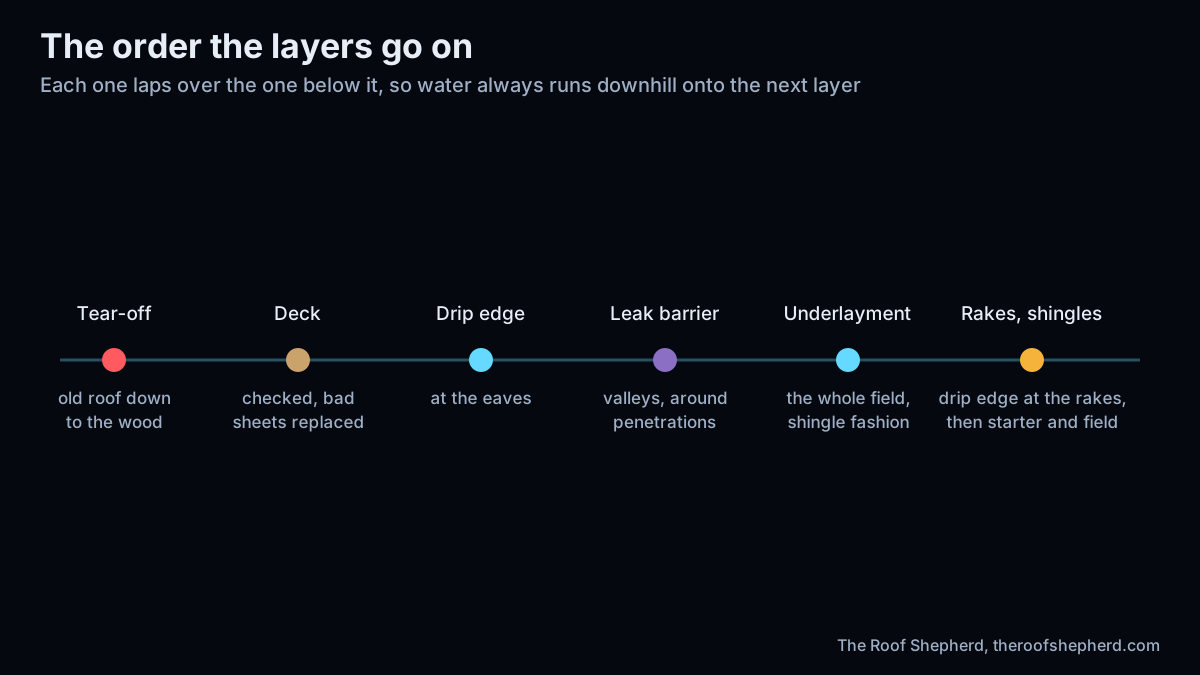
The edges are where the order changes. GAF's leak barrier instructions put the drip edge on first at the eaves and the leak barrier over it, and at the rakes the leak barrier goes on first with the drip edge over it. GAF's FeltBuster instructions set the same order for underlayment: over the drip edge at the eaves, under it at the rakes.
Leak barrier also has conditions. The same instructions say to apply it to a dry deck with the air between 45 and 120 degrees F, with end laps of at least 6 inches and courses overlapping at least 3 inches. A cold morning below that range is a real reason to wait before it goes down.
GAF StormGuard application instructions: apply to a dry deck with air temperature between 45 F and 120 F; at the eave install the drip edge first, at the rake install the leak barrier before the drip edge; minimum 6 in end laps, 3 in overlap on following courses; at the eaves, extend at least 24 in past the interior warm inside wall.
The Gap
Weather, time and a wet deck
Underlayment is a temporary stage, with a time limit
Between tear-off and the last shingle, the underlayment and leak barrier are all that keep rain out of the house. Fastened and lapped the way its instructions say, it is made to shed rain until the shingles go on. It is still a temporary stage, and the product instructions put a time limit on it.
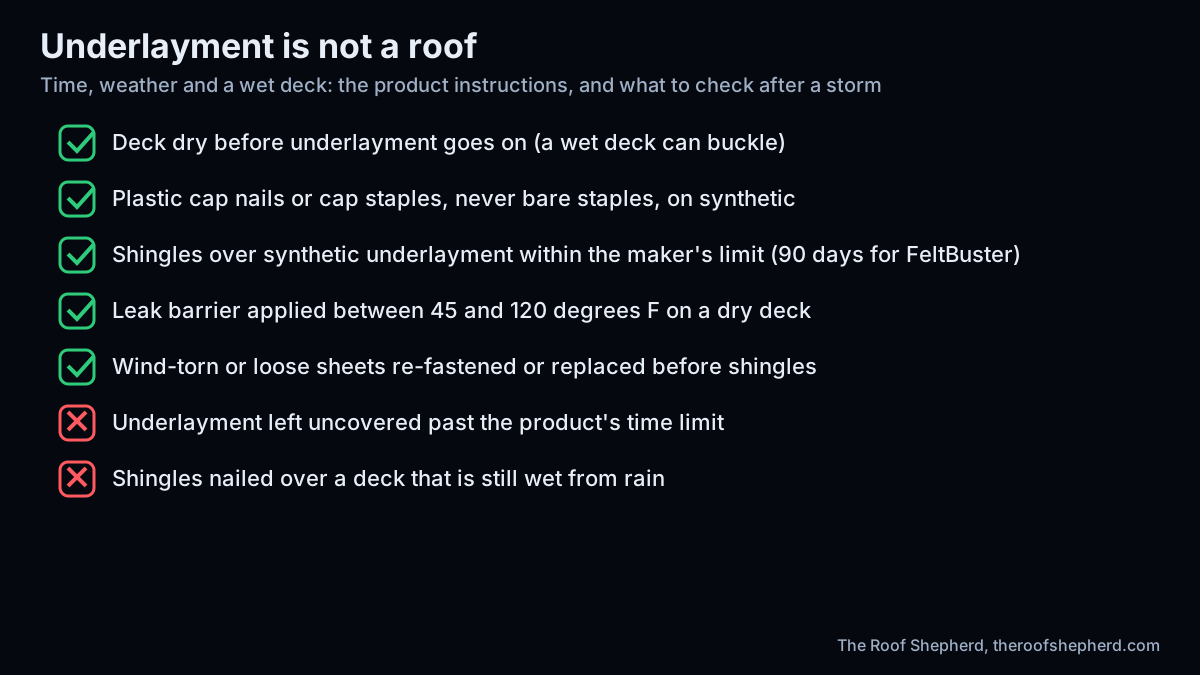
GAF's FeltBuster instructions require the shingles to go on within 90 days and say the deck must be dry first, because a wet deck can swell and buckle under the new roof. APA's guidance for roof sheathing is the same in spirit: cover the panels promptly to limit their exposure to weather. The 90 days is a limit, not a schedule: ask when the shingles will follow the tear-off, and ask that nothing be shingled over a deck still wet from the last storm.
If a storm hits mid-job, the questions afterward are simple: did any sheet tear or lift, did water get under a lap, and is the deck dry before the shingles cover it. A torn or loose sheet gets re-fastened or replaced first, and the photographs should show it.
GAF FeltBuster: asphalt shingles must be installed over it within 90 days; the deck must be dry to prevent buckling. APA N335: cover sheathing with underlayment to minimize exposure to weather unless the panel manufacturer says otherwise.
Before It Is Covered
What to ask about the layers you will never see again
Six questions, and the photographs that answer them
Because the deck, underlayment and leak barrier disappear on day one, the practical way to know they were done right is to ask before the job and see the photographs after it. These are ordinary questions about the scope of work.
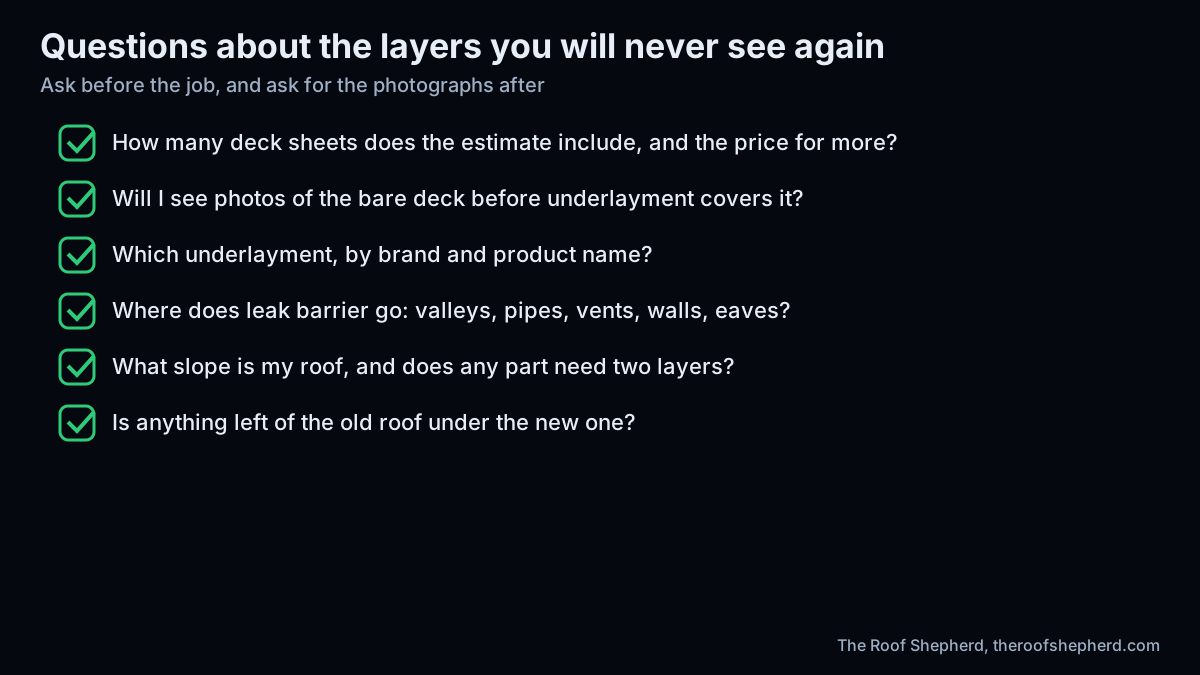
Before signing, ask how many deck sheets the estimate includes and what each additional sheet costs, which underlayment and which leak barrier are being installed by brand and product name, where the leak barrier goes on your roof, and whether any part of your roof is shallow enough to need two layers of underlayment. Those answers belong in writing on the estimate, not in a conversation.
After the job, ask for the photographs: the bare deck before underlayment, every replaced sheet, leak barrier in the valleys and around each penetration, and the underlayment before shingles covered it. Those photos are the clearest record of three layers no one will see again, and they are worth keeping with the rest of your roof paperwork.
Photograph the deck before underlayment, each replaced sheet before and after, leak barrier at valleys and penetrations, and the underlayment before shingles. Record the underlayment and leak barrier product names on the invoice.
Deck & Underlayment Questions
Common questions about deck & underlayment
Do I need to replace my whole roof deck when I get a new roof?
Not as a rule. Sheets that are rotted, soft, delaminated or damaged are replaced, and sound sheets stay. Spaced or skip sheathing is the exception: the code requires asphalt shingles to be fastened to a solidly sheathed deck, and GAF does not recommend installing shingles over spaced boards, so those roofs need solid sheathing first.
Is synthetic underlayment better than felt?
Both keep water off the deck and both are accepted by the code, felt by name and synthetics through evaluation reports. The differences are in each product's own instructions: how it is fastened, how far it laps, and how long it can be left uncovered. Ask which one your estimate includes, by product name.
Is ice and water shield required in Central Texas?
Not at the eaves in Austin or Georgetown, whose adopted code tables say an ice barrier is not required. Leak barrier in valleys and around penetrations is a separate question: ask where it goes on your roof, by product name.
How long can a roof sit with only underlayment on it?
Only as long as its instructions allow. GAF's FeltBuster instructions require shingles within 90 days. That is a limit, not a target: underlayment is a temporary stage, so ask when the shingles will follow the tear-off.
What thickness should my roof deck be?
GAF's minimum is 3/8 inch exterior-rated plywood or OSB. IBHS requires 7/16 inch for a FORTIFIED designation. Either way, the span rating stamped on the panel should suit the framing under it.
Why is decking priced separately on a roofing estimate?
Because nobody can see the deck until the old roof is off. A clear estimate includes a set number of sheets and states the price for each additional one, and the final invoice should show a count backed by photographs of each replaced sheet.
Still have a question about your roof?
Get a straight answer and your real options, no obligation, never a hard sell. Most messages get a same-day reply, often within the hour.
Prefer a person? Call or text 512-575-5052, 8am to 9pm, seven days a week.
Get Help Ask Shepherd AIKeep Learning
Where to go from here
Each guide below picks up a thread from this page: what the layers cost, what storms do to them, and how to hire the person who touches them.