
Roofing 101 · Where Water Gets In
Where Roofs Leak: Flashing, Penetrations and Transitions
Almost every roof leak starts where the roof stops being a roof: at a wall, a chimney, a pipe, a skylight, or the line where two slopes meet. This is every one of those places, what is supposed to be there, what it looks like when it is right, and how water gets past it when it is not.
Updated September 6, 2026
The Principle
Why leaks start at transitions, not in the field
A roof sheds water. A transition has to redirect it.
In the open field of a roof, shingles overlap downhill and gravity does the work. Water lands, runs down, and drops off the edge. Nothing is asked of the roof except to be lapped the right way. A transition is any place that simple rule stops applying: a wall rising out of the slope, a chimney standing in the flow, a pipe punching through, two slopes meeting in a valley. At each of those places water has to be caught, turned and released back onto the field, and the piece of metal or membrane that does that is the flashing.
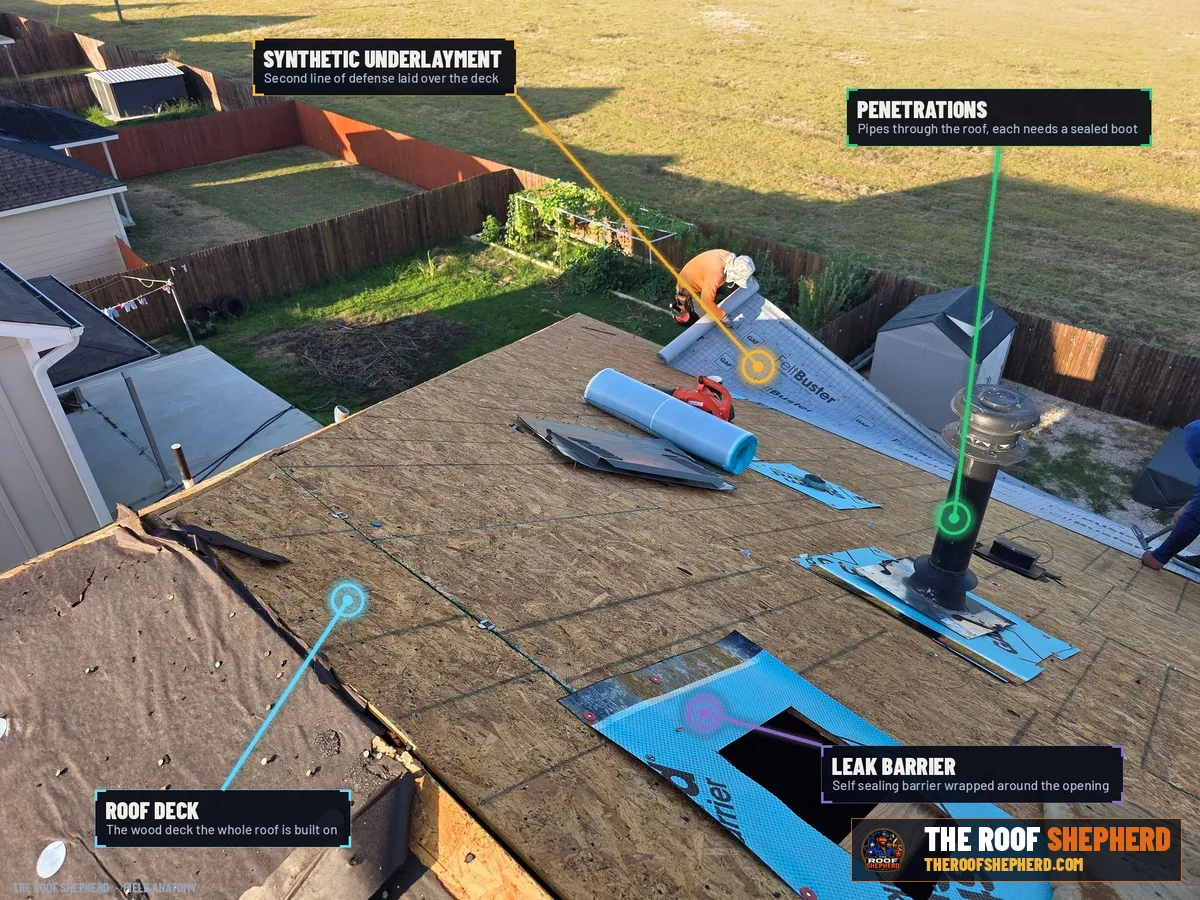
That is why leaks concentrate where they do. A shingle field that is lapped correctly can go decades without a drop getting through, while a chimney flashed wrong can leak the first spring. When David inspects a roof he walks the transitions first and the field last, because the transitions are where the roof is doing something hard.
Every flashing detail on this page follows one rule, and once you can see it you can judge any roof: water must always land on top of the next piece down. Metal over membrane over deck, upper piece over lower piece, uphill over downhill. Where that order is reversed, the roof is relying on sealant, and sealant is temporary.
IRC R903.2.1: flashing is required at wall and roof intersections, wherever there is a change in roof slope or direction, and around roof openings. The code names the places; the manufacturer's instructions and the trade's standard details say how.
The Rule
Lapping: the one rule that governs every detail
Uphill over downhill, always
Every flashing detail is a set of overlaps. Each one is arranged so that water running downhill lands on top of the next surface, not behind it. The underlayment laps over the drip edge at the eave. Step flashing laps over the shingle below and under the shingle above. Counter flashing laps over step flashing. A pipe boot's flange sits over the shingles on its downhill side and under them on its uphill side. There is no exception to this anywhere on a roof that is built right.
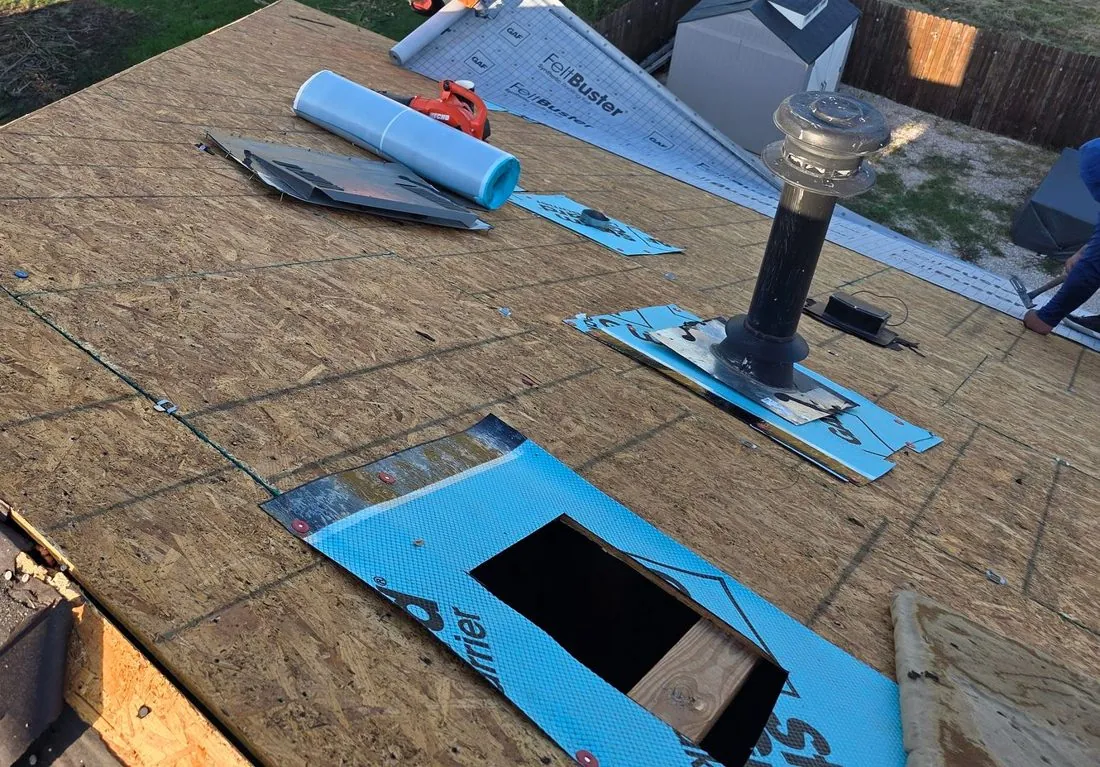
The reason it matters so much is that flashing does not seal a roof. It is not glued or caulked into a watertight box. It directs water, using nothing but the overlap and gravity, and a correctly lapped detail will keep working after every bead of sealant on the roof has dried out and cracked. A detail that depends on sealant to hold water back has a life measured in the life of the sealant, which in Texas sun is a handful of years.
When you look at any of the photos on this page, look for the order. If you can find a place where a lower piece sits on top of an upper piece, you have found where the leak will start.
The trade's reference details for lapping and flashing are published by the National Roofing Contractors Association and by each shingle manufacturer. A manufacturer's warranty is conditioned on its own details being followed.
The Hardest Detail
Chimney: four flashings doing four jobs
Apron, step, counter and, above 30 inches, a cricket
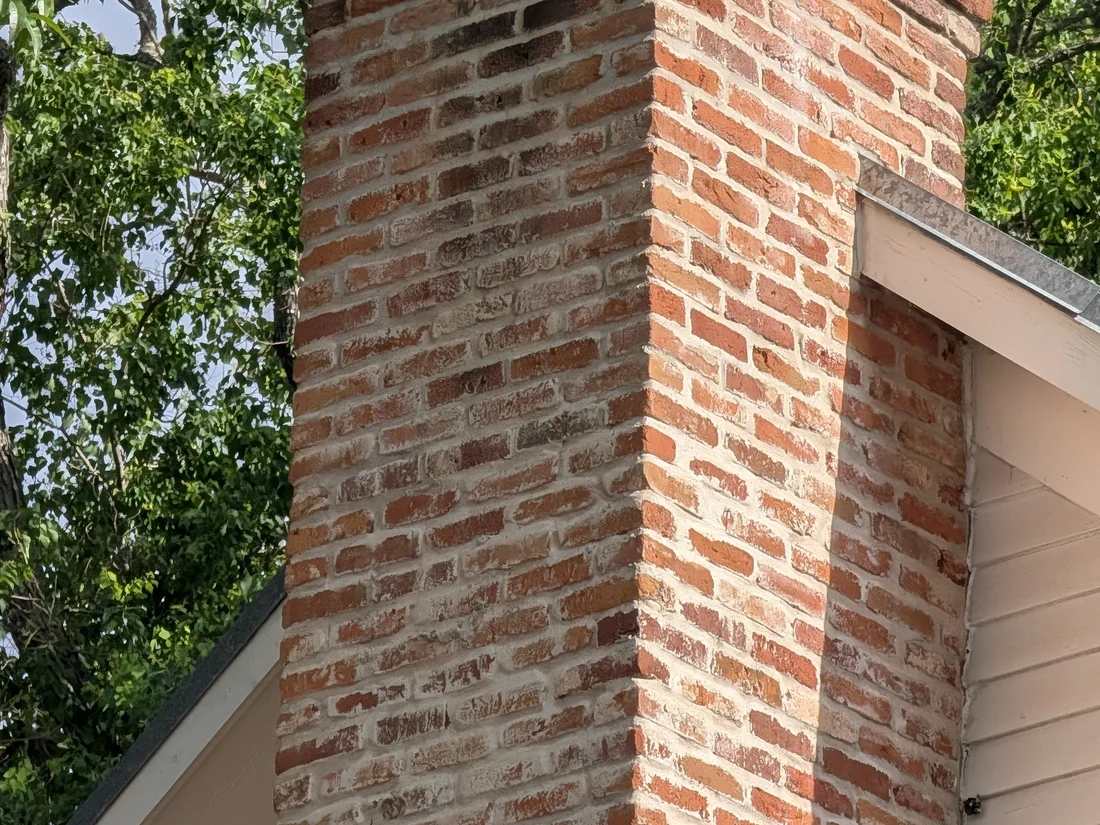
A chimney is the hardest thing on a roof to keep dry. Water reaches it from every side, and it moves on its own, apart from the roof. Masonry expands and settles on its own schedule. So a chimney is not flashed with one piece; it is flashed with a system of four, each handling one face.
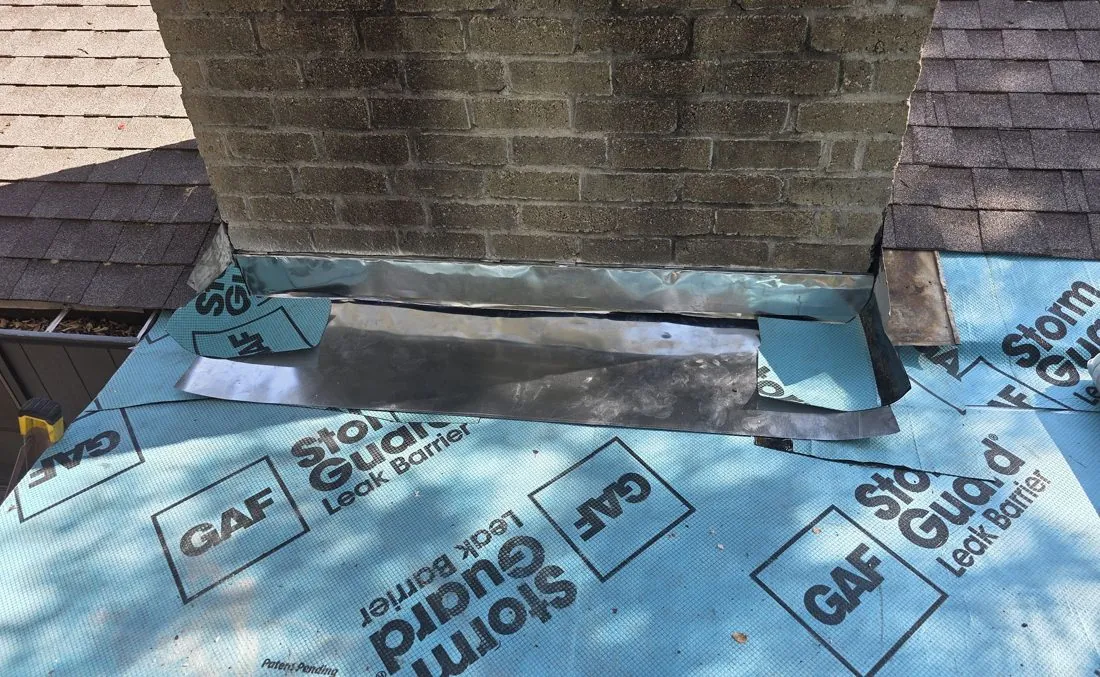
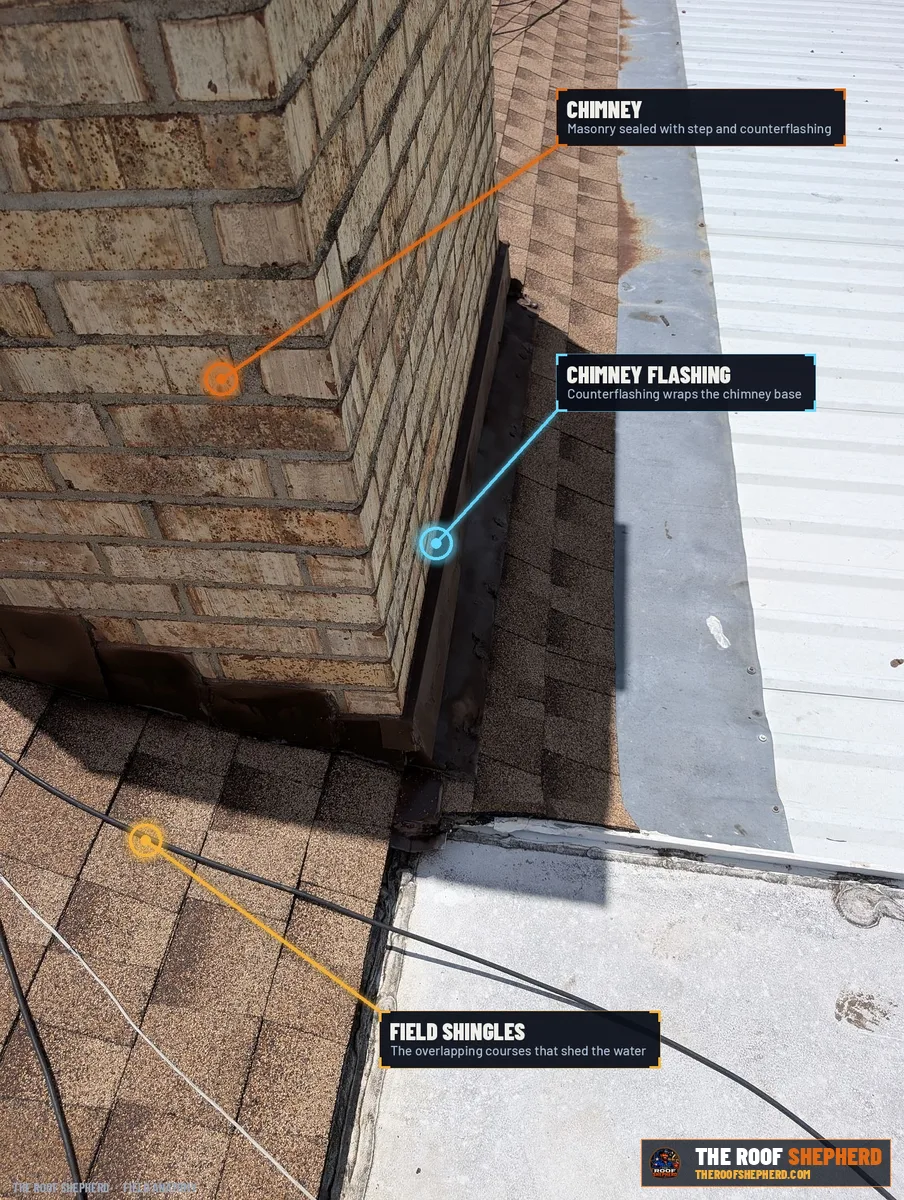
On the downhill face is the apron flashing, a single bent piece that runs up the chimney and out over the shingles below. Up each side is step flashing, one short L-shaped piece per shingle course, lapped with the shingles so each step catches water and hands it to the shingle below. Over all of that is counter flashing, set into the mortar joints of the chimney and bent down over the step and apron pieces, so that water running down the masonry is thrown out onto the metal below rather than behind it. And on the uphill face, if the chimney is more than 30 inches wide, a cricket splits the water around it.
The failure you see most often in Central Texas is counter flashing that was surface-mounted and caulked to the brick instead of cut into the mortar joint. It looks fine for two summers. Then the caulk lets go, water runs down the brick face behind the step flashing, and the ceiling stain appears a few feet downhill of the chimney.
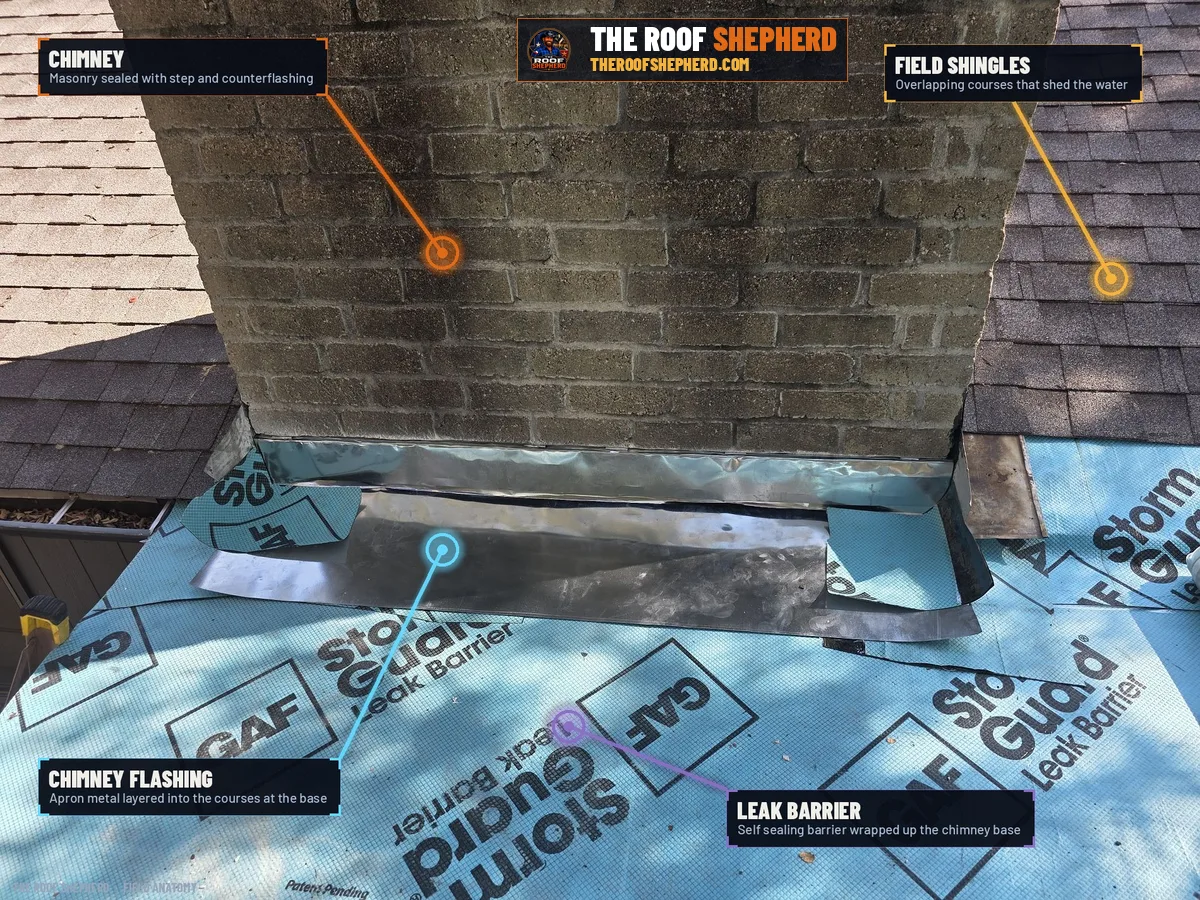
Counter flashing is set into a raked mortar joint and lapped over the base flashing. The IRC requires a cricket or saddle on the ridge side of any chimney more than 30 inches wide measured perpendicular to the slope.
Behind the Chimney
The cricket: a small roof that protects a big one
Why the uphill side of a chimney needs its own ridge
Water running down a slope hits the uphill face of a chimney and stops. With nowhere to go it pools, carries leaves and grit with it, and sits against the flashing until it finds a way through. A cricket, also called a saddle, is a small peaked structure framed behind the chimney so that water arriving from above is split left and right around it and back onto the field.
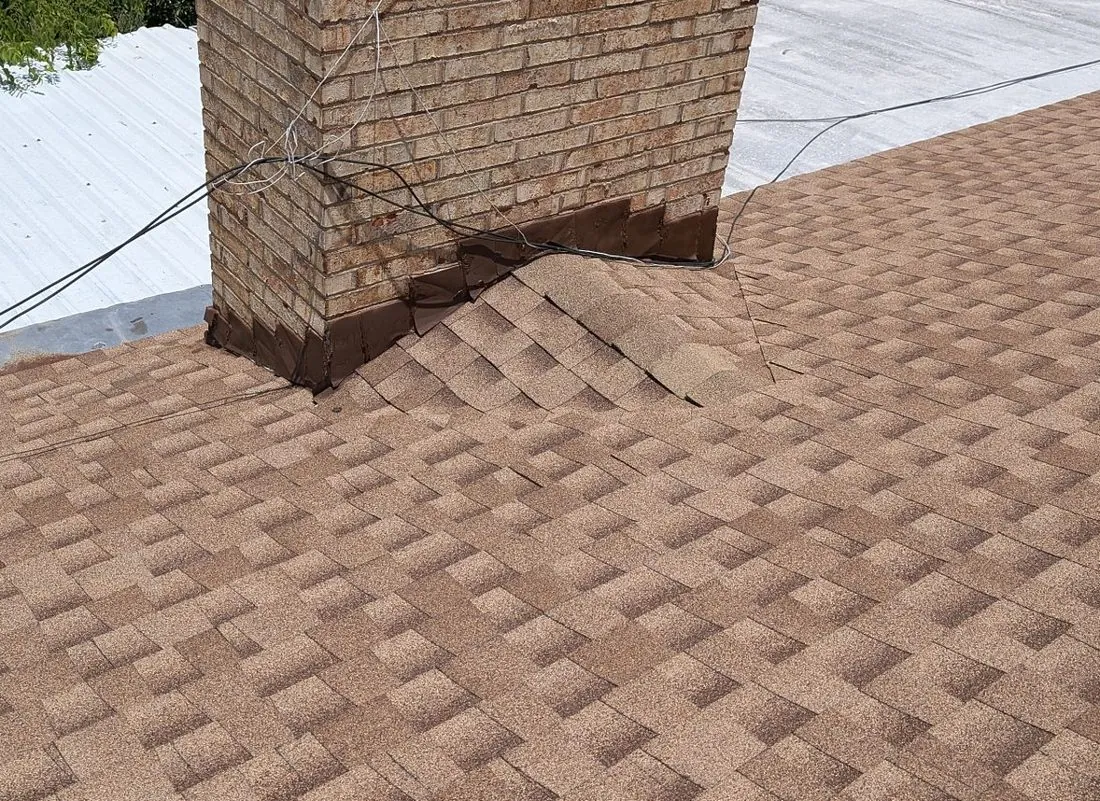
The code sets the threshold at 30 inches of chimney width, but the physics does not change below that; a narrow chimney simply has less water stopping against it. On a wide masonry chimney with no cricket, the uphill face is the single most likely leak point on the whole house, and it is the one that is invisible from the ground.
A cricket is flashed like a miniature roof: its own underlayment, its own step flashing where it meets the chimney, and its own valleys where it meets the main slope. That is a lot of detail in a small space, which is why crickets are often skipped on a reroof and why David checks for one on every chimney he inspects.
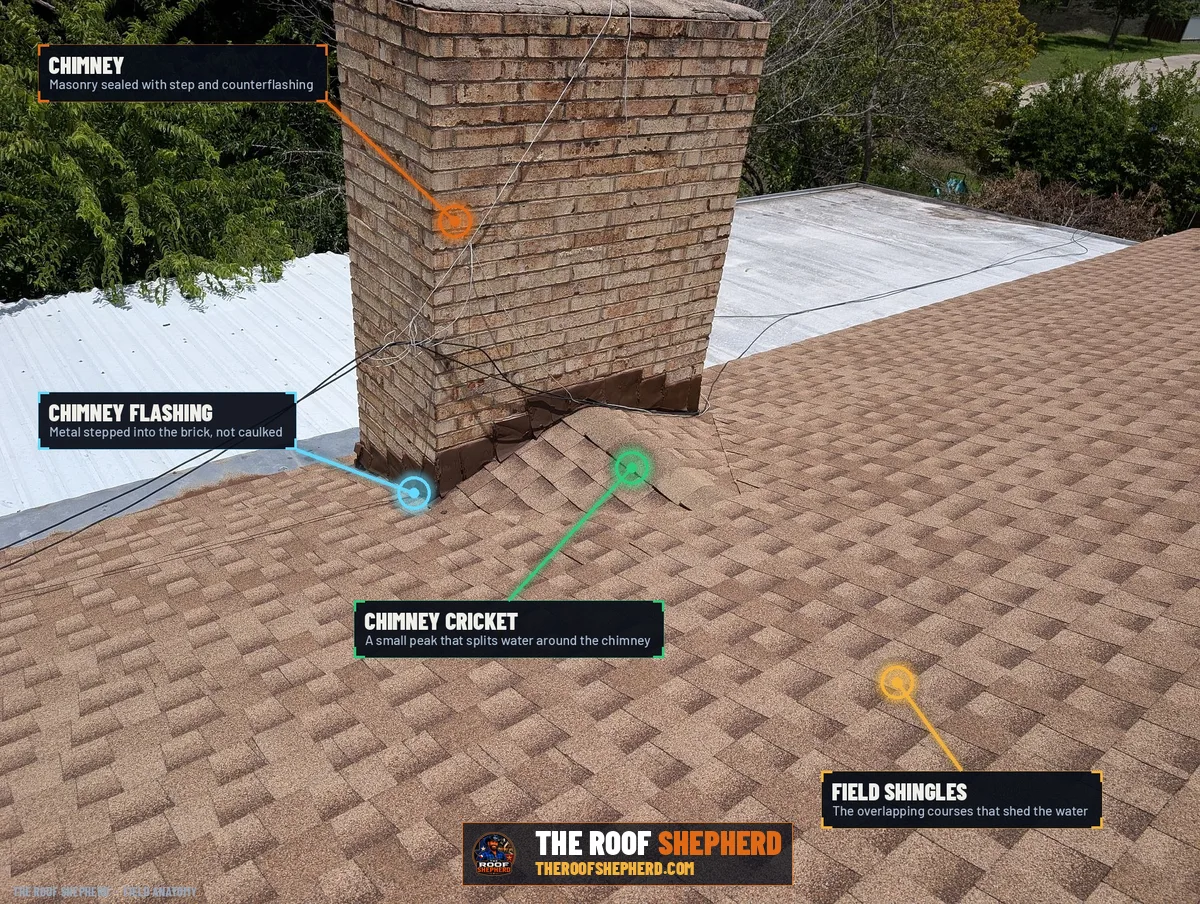
IRC: a cricket or saddle is required on the ridge side of any chimney or penetration more than 30 inches wide measured perpendicular to the slope. Cricket height and slope are set by the chimney width and the roof pitch.
Where Roof Meets Wall
Sidewalls: step flashing, one piece per course
The detail that is done wrong most often, and why
Where a roof slope runs along a wall, the flashing is stepped. That wall might be a second story above a porch roof, the side of a dormer, or the wall of an addition. Each shingle course gets its own L-shaped piece of metal, one leg up the wall and one leg on the roof, lapped with the shingles so that water running down the wall lands on a step, runs onto the shingle below it, and continues down.
The wrong way, and it is common, is a single continuous strip of metal run the length of the wall and caulked. A continuous strip cannot lap with the shingles, so water that gets behind it has a straight run to the deck. Step flashing is more work, one piece per course, and it is the only method that keeps working without sealant.
The wall side of the step is covered by the siding or by counter flashing, so a finished sidewall shows almost nothing. The way to check it is at the bottom, where the last step should turn out into a kickout that throws water into the gutter rather than down the wall.
IRC: base flashing against a vertical sidewall is continuous or step flashing not less than 4 inches high and 4 inches wide. Step pieces are lapped with each course so no water runs behind a lower piece.
Wall Above the Slope
Headwalls: where the slope dies into a wall
Apron flashing, and why it must be continuous
Where a roof slope runs uphill into a wall, the flashing at the top is an apron. That wall might be a second story above a porch roof, or the main house above a lower roof. The apron is one continuous piece bent to run up the wall and out over the top course of shingles. Water coming down the wall lands on the apron and is delivered onto the shingles.
Unlike a sidewall, a headwall is flashed with one piece, and it has to be continuous because there is no shingle course to lap between segments. Where lengths of apron meet, they overlap several inches in the direction of water flow. The wall leg tucks behind the siding or the housewrap, never in front of it, or water running down the wall goes behind the metal.
The common failure is at the ends, where the headwall turns into a sidewall. That corner is where an apron, a step and often a kickout all meet, and it is where a careful roofer spends the most time and a hurried one does not.
Apron (base) flashing at a headwall runs continuously along the wall, lapped in the direction of drainage, with the vertical leg behind the weather-resistive barrier of the wall.
Two Slopes Meet
Valleys: open, closed-cut and woven
The highest-flow line on the roof
A valley is where two slopes meet at an inside corner and their water combines. Every drop that lands on either slope above the valley ends up in it, so a valley carries more water per foot than anywhere else on the roof, and it carries it fast. There are three ways to build one.
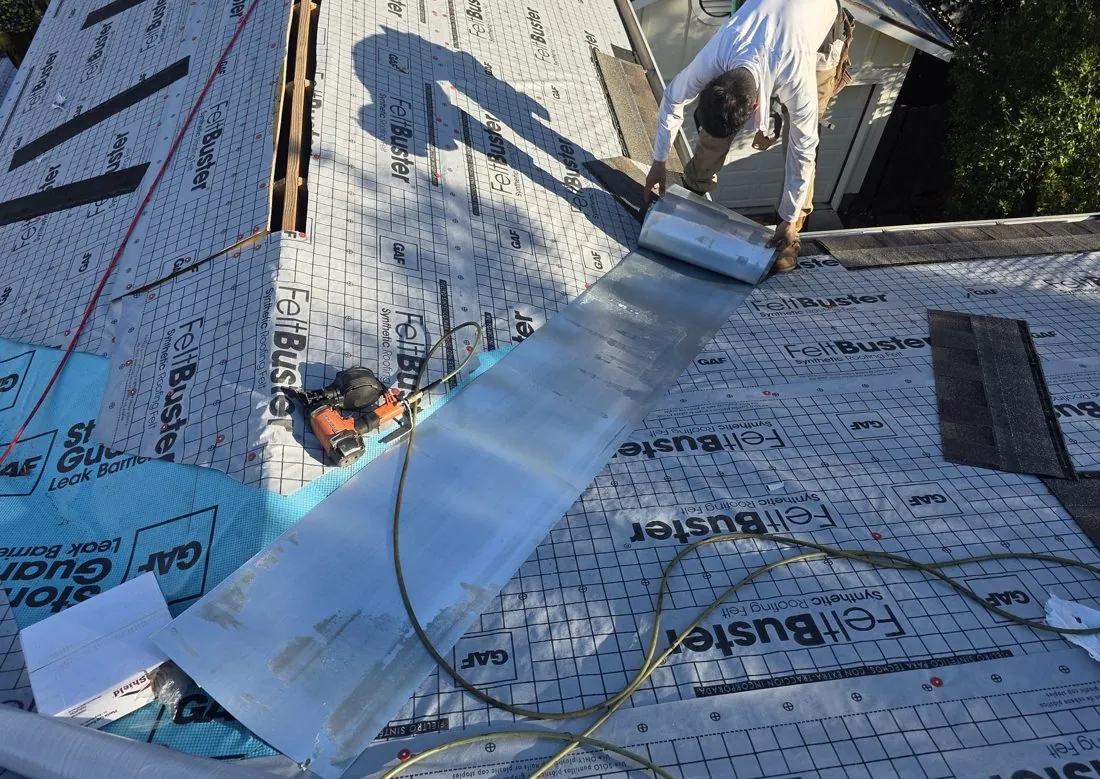
An open valley has a metal liner left exposed, with the shingles on each side cut back to leave a channel. It sheds debris best, it is the easiest to inspect, and it is the right choice for long valleys and low slopes. A closed-cut valley runs one slope's shingles across the centerline and cuts the other slope's in a straight line just off center; it is the most common valley on Central Texas homes, and it depends entirely on the leak barrier underneath, because no metal is exposed. A woven valley interlaces shingles from both sides; it only works with three-tab shingles, because laminated shingles are too thick to weave flat and the result traps water.
Whatever the method, the leak barrier under the valley is the detail that decides whether it lasts. Valleys are where a self-adhered membrane earns its cost, and where its absence shows up first.
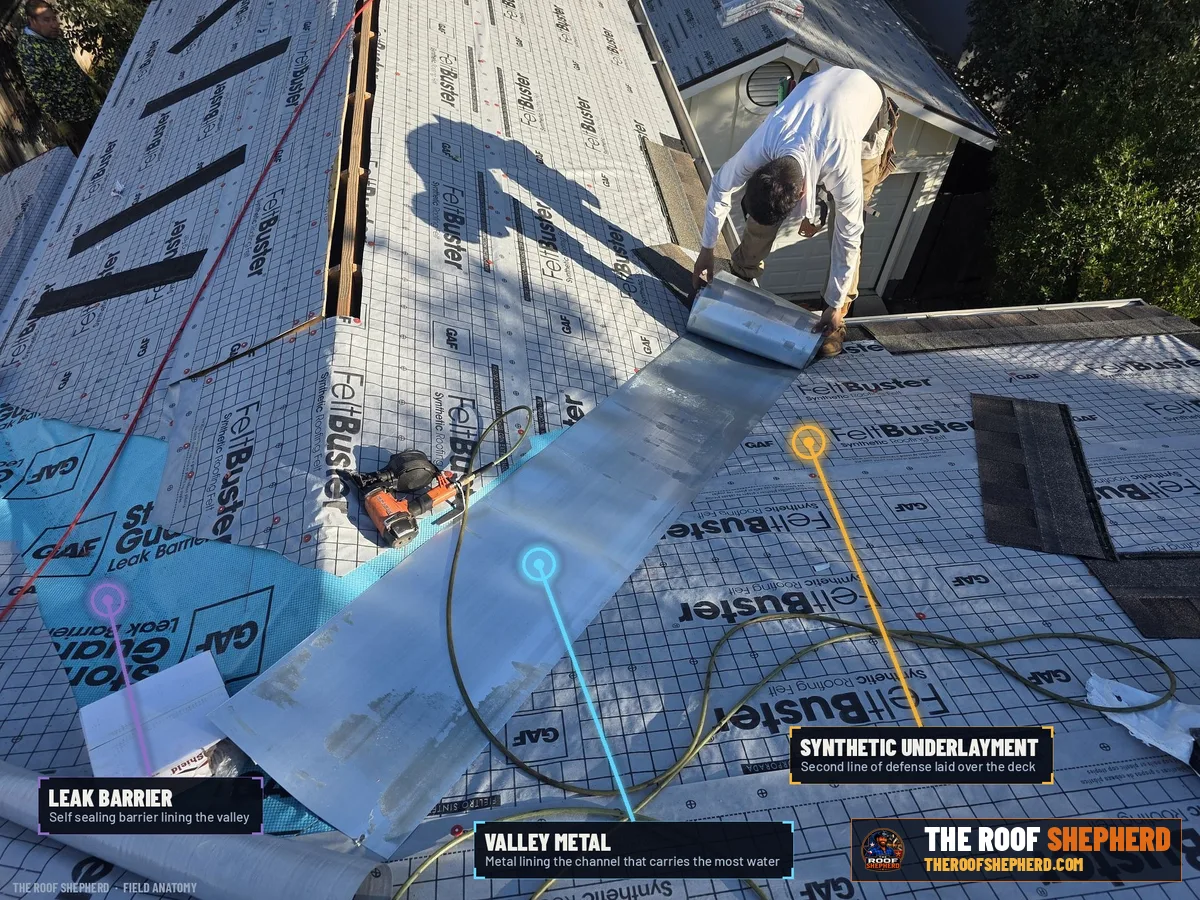
IRC R905.2.8.2: open valleys lined with metal use a liner not less than 24 inches wide. Closed and woven valleys are built to the shingle manufacturer's instructions, which specify the underlayment beneath and, for laminated shingles, exclude weaving.
Pipes and Vents
Pipe boots: the leak with a schedule
Neoprene collars and the Texas sun
Every plumbing vent pipe through the roof is sealed by a boot, also called a jack. It has a metal or plastic flange that laps with the shingles and a rubber collar that grips the pipe. The flange is fine for the life of the roof. The collar is not. Neoprene hardens and cracks in ultraviolet light, and in Texas that takes something like eight to twelve years, which is well inside the life of the shingles around it.
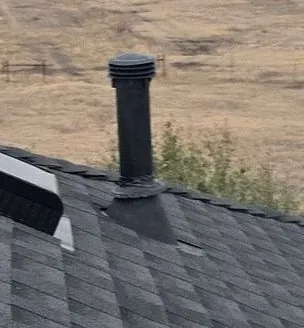
That makes a cracked pipe boot the most predictable leak on an older roof. It is small, it is slow, and the drip lands on the pipe and runs down it into the wall, so the stain shows up in a bathroom ceiling or behind a vanity long after the collar split. On a roof that is otherwise sound, replacing the boots is a repair, not a replacement.
Lead boots avoid the collar altogether by folding a soft lead sleeve down into the pipe, and they last as long as the roof, though squirrels sometimes chew them. Whatever the boot, the flange must sit over the shingles on the downhill side and under them on the uphill side, the same lapping rule as everything else.
Pipe flashings are lapped with the shingles per the manufacturer's instructions: flange over the shingles below, under the shingles above, with fasteners under the shingle cover. Collar material and expected life vary by product.
Openings
Skylights: a curb, a kit and a lot of edges
Why the glass is rarely the problem
A skylight is a chimney made of glass: a rectangular hole in the roof with water arriving on its uphill side and running down both sides. Most residential skylights sit on a curb, a raised wood frame that lifts the unit above the plane of the roof, and the curb is flashed exactly like a small chimney: an apron across the bottom, step flashing up each side, and a head flashing across the top, with a cricket if the unit is wide.
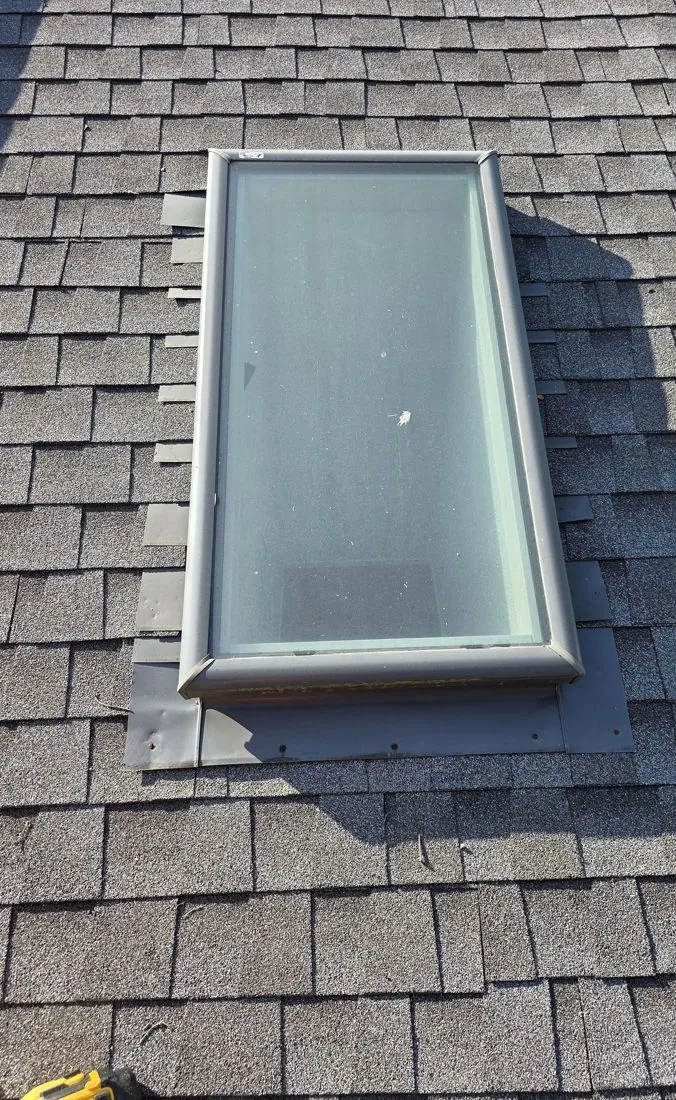
Manufacturers sell flashing kits matched to their units, and the kit is the right answer nearly every time. A skylight flashed with site-bent metal and sealant instead of its kit is a skylight that will leak at the head or the corners within a few seasons. Deck-mounted skylights, which have no curb, rely even more heavily on the kit and on leak barrier wrapped up the frame.
When a skylight does leak, the glass seal is the last suspect, not the first. Check the uphill corners of the flashing, the head flashing lap, and, on older units, the condition of the sealant at the frame, before assuming the unit itself has failed.
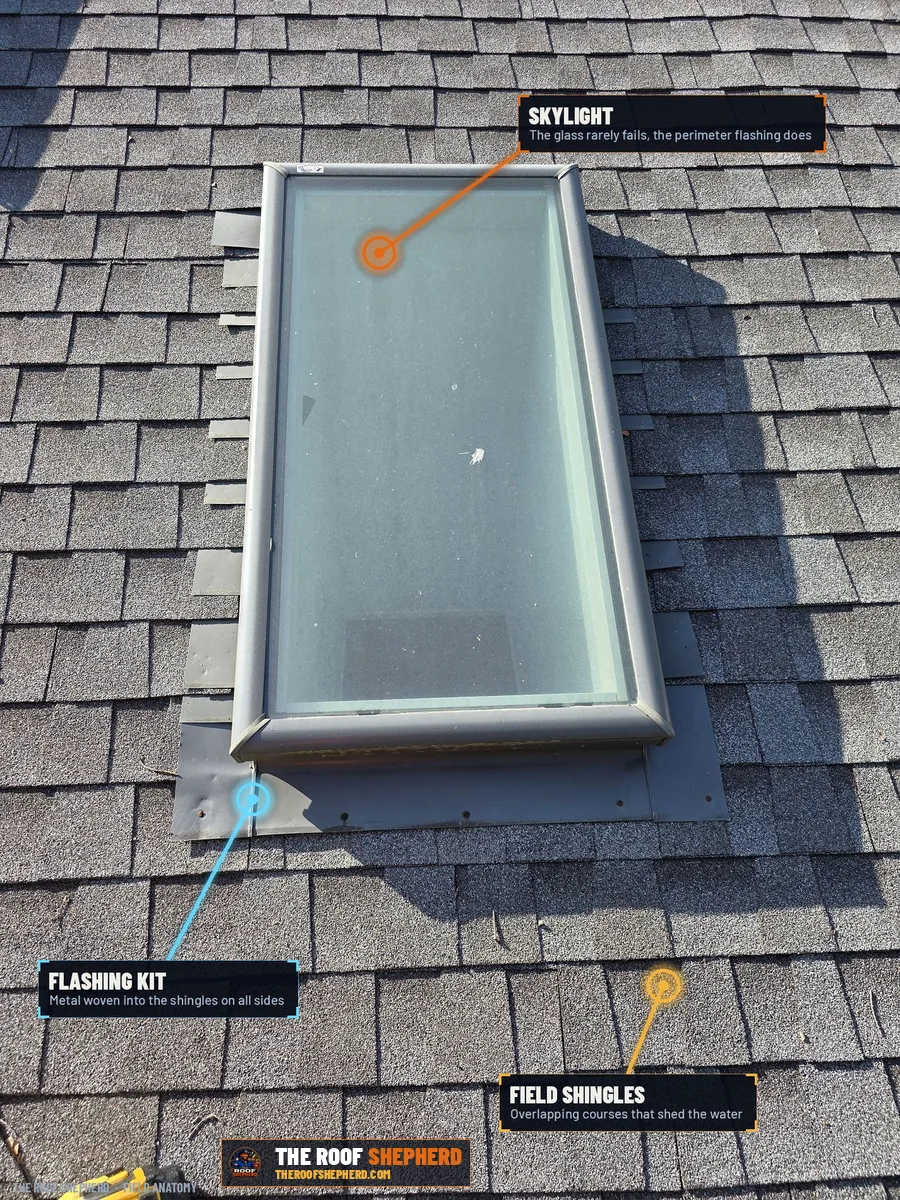
Skylights are installed and flashed to the manufacturer's instructions, which govern the warranty. Curb height, flashing kit and, where required, a cricket on the uphill side follow the same rules as any other roof opening.
Four Details in One
Dormers: every transition on this page, in one place
Why a dormer is inspected as a system
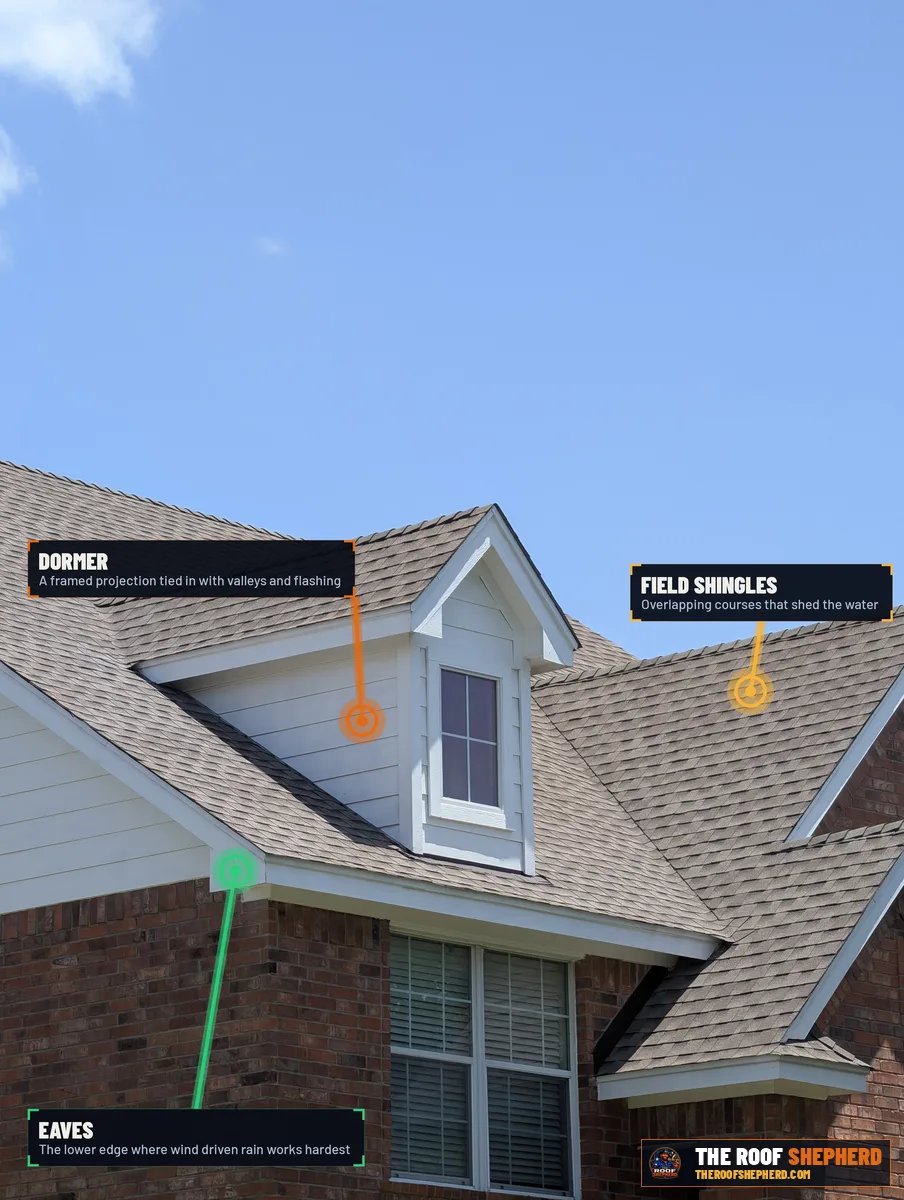
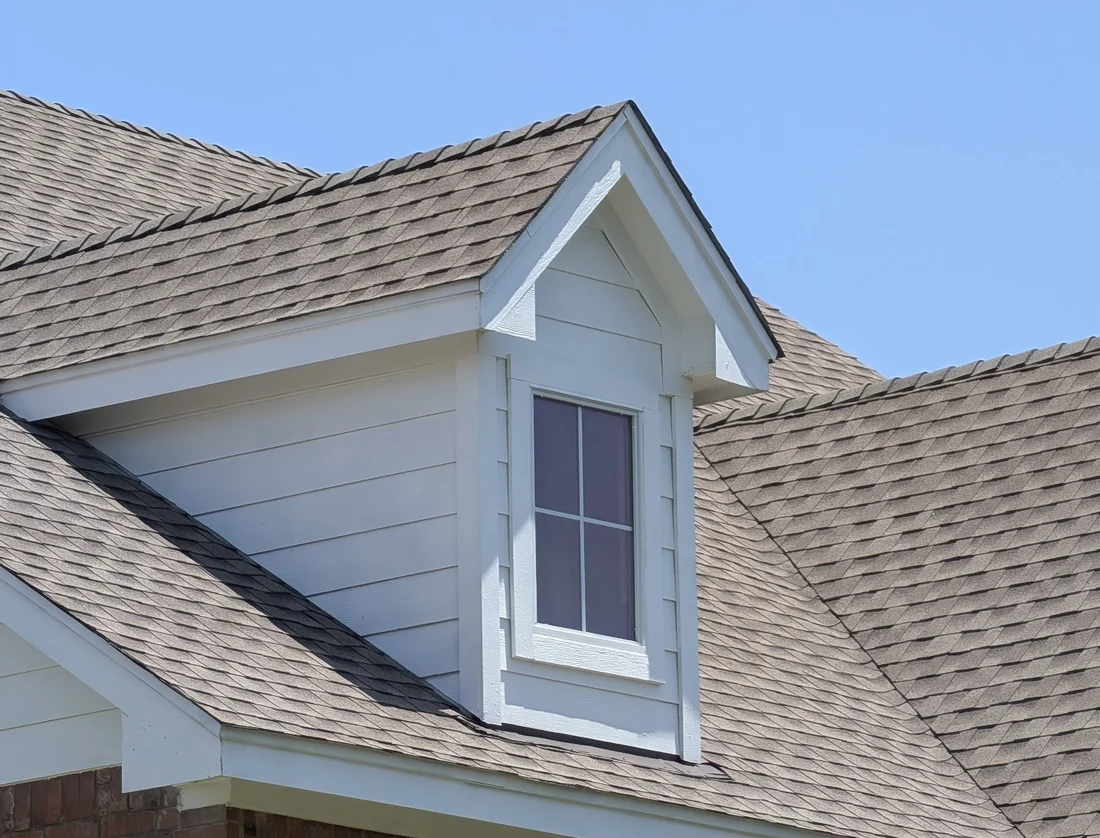
A dormer is a small structure built out of a roof slope with its own roof, walls and usually a window. Built into a slope, it creates a headwall where the main slope runs up into the dormer's front, two sidewalls along its flanks, and, where the dormer roof meets the main roof, two small valleys or a pair of hips. That is four flashing details on a single feature, plus a window, plus siding, plus the corners where each detail meets the next.
The corners are where dormers leak. The point where a sidewall step flashing meets the headwall apron, and the point where the dormer's own roof edge meets the main slope, each involve three pieces of flashing coming together, and each has to be lapped in the right order in three dimensions at once. A roofer who does dormers well is worth finding.
On an inspection David treats a dormer as a system and walks around it, because a stain below a dormer can come from any of its four sides and the water rarely enters where it exits.
Each face of a dormer is flashed by its own rule: apron at the headwall, step flashing at the sidewalls, valley or hip construction where the roofs meet. The corners are detailed so every piece laps over the piece below it.
Underneath Everything
Leak barrier: the second line under every detail
Self-adhered membrane, and where it belongs in Texas
Under every transition on this page there should be a self-adhered membrane. It is a sheet of rubberized asphalt with a peel-off backing. It sticks to the deck and seals around the nails driven through it. In cold states it is called ice-and-water shield and the code requires it at the eaves to stop ice dams. Central Texas has no ice dams, so the code here does not require it at the eaves, and that leads some roofers to leave it off entirely.
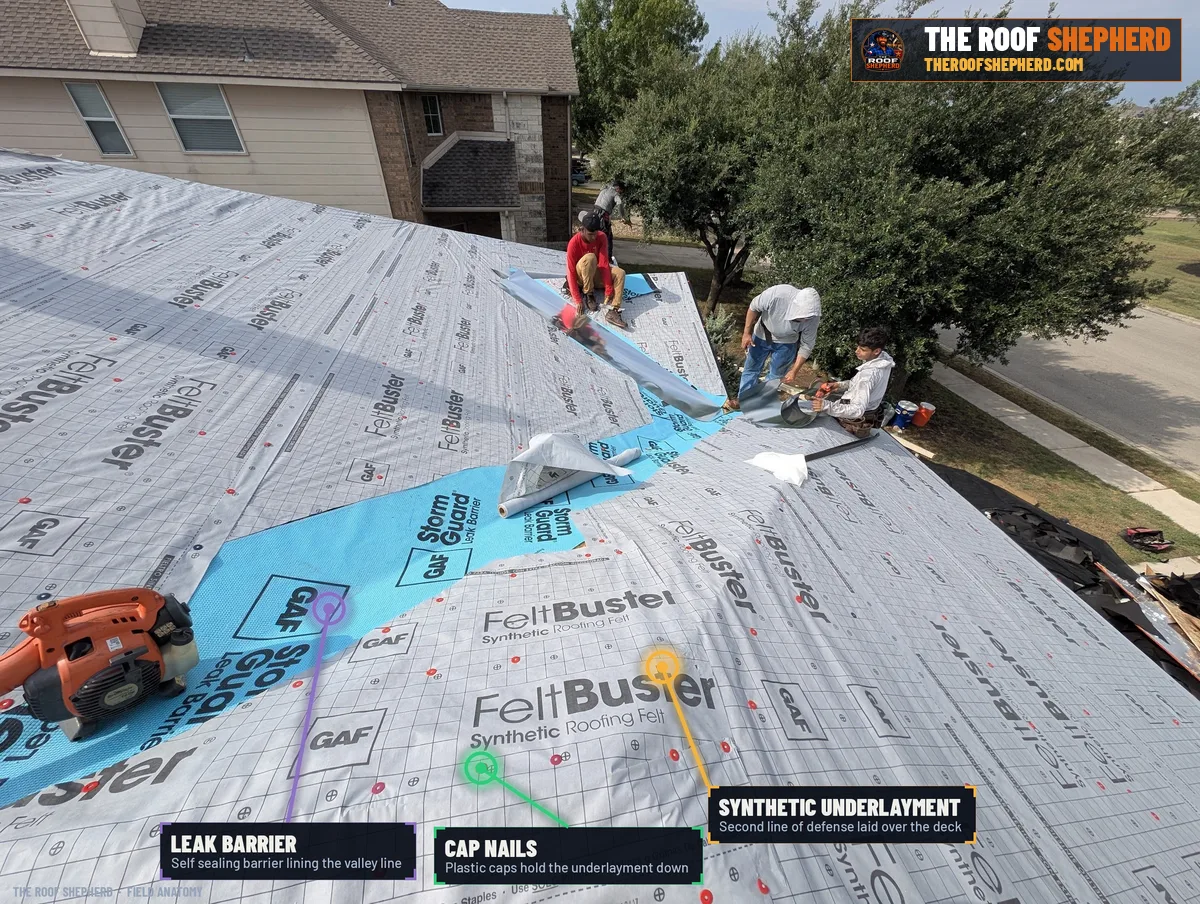
That is a mistake, because ice was never the only reason for it. In valleys, around chimneys and skylights, along sidewalls and around every penetration, the membrane is what catches water that gets past the flashing and delivers it back onto the underlayment instead of into the deck. Manufacturers require it at those locations for their warranties, and the FORTIFIED standard requires it as part of a sealed deck.
It is invisible on a finished roof, which is why it is worth asking about before the shingles go on and why a field record photographs it. A roof with membrane under every detail and one without look identical from the driveway and behave very differently in the tenth year.
IRC R905.1.2 requires an ice barrier at the eaves only where there is a history of ice forming there, which does not apply in Central Texas. Manufacturer installation instructions and the FORTIFIED Roof standard specify self-adhered membrane at valleys, penetrations and roof-to-wall transitions regardless of climate.
The Last Resort
Sealant: what it is for and what it cannot do
A roof held together with caulk is a roof with deferred leaks
Sealant has a place on a roof, but a small one. It belongs at exposed fastener heads, at the top edge of counter flashing, at the collar of a pipe boot, and in a pitch pocket around an odd-shaped penetration. In every one of those places it is doing a small, secondary job, protecting a spot where the lapping rule could not be fully applied. It is never the primary defense, and a roof where it is has already failed and does not know it yet.
The reason is simple. Every sealant dries, shrinks and cracks. Asphalt roof cement, the black mastic sold in tubs, lasts a few years in sun before it checks like dried mud. Polyurethane and silicone last longer but still fail, and when they fail they fail invisibly, as a hairline gap that lets water in without anything looking wrong. A flashing that depends on that gap staying closed has a life measured in the life of the caulk.
So when an inspection finds heavy sealant at a transition, it is read as evidence of a flashing that was not lapped, not as a repair. The honest fix is nearly always to rebuild the detail so the metal does the work and the sealant goes back to being secondary.
Sealants are used at the top edge of counter flashing, at exposed fasteners and at pipe collars, per manufacturer instructions. They are maintenance items with a service life shorter than the roof and are inspected on that schedule.
Diagnosis
Reading a leak: where the stain is versus where the water got in
Water travels. The stain is the exit, not the entry.
Water that gets through a roof does not fall straight down. It lands on the underlayment or the deck and runs downhill on top of it, sometimes for many feet, until it finds a nail, a seam or a rafter to follow into the attic. Then it runs along the rafter or the top of the drywall until it finds a low point or a joint and drips. The ceiling stain marks where the water came out. The leak is uphill of it, sometimes well uphill.
That is why the transitions on this page are the first stop when tracing a leak. Draw a line straight uphill from the stain, on the same slope, and look for what the line crosses: a pipe boot, a valley, a sidewall, a chimney. The first transition uphill of the stain is the leading suspect. If there is nothing uphill but open field, look for a nail pop or a lifted shingle, and if the stain appears only in wind-driven rain, look at the rakes and the headwalls, which take rain sideways.
A field record of a leak states where the stain is, what is uphill of it, what was found at each transition, and what was done. Without that record, the same roof gets the same wrong repair twice.
Leak diagnosis follows water uphill from the point of appearance to the nearest transition on the same slope. Attic inspection during or after rain, with a light on the underside of the deck, locates the entry point directly when the roof surface does not.
Flashing & Leaks Questions
Common questions about flashing & leaks
Why does my roof leak only when it rains hard, or only in wind?
Ordinary rain runs straight down and a marginal flashing can handle it. Heavy rain overwhelms a valley or a cricket that is too small, and wind drives water sideways under rakes and into headwalls that never see water in a calm rain. A leak that depends on the weather is a flashing problem, not a shingle problem, almost every time.
The stain is nowhere near a chimney or a pipe. Where is the leak?
Uphill of the stain, on the same slope. Water runs on top of the underlayment and along rafters before it drips, so the entry can be several feet above where it shows. Trace a line uphill and inspect the first transition it crosses; if there is none, look for a nail pop or an unsealed shingle in the field.
Can flashing be repaired, or does the whole roof have to be replaced?
Flashing can be repaired or rebuilt on its own when the shingles around it are sound. A cracked pipe boot, a rusted step, a chimney with surface-mounted counter flashing are all repairs. What decides it is the condition of the shingles the new flashing has to lap with; on a roof at the end of its life, a flashing repair buys a season.
Is ice-and-water shield required in Central Texas?
Not at the eaves, because the code only requires it where ice dams form. It is required by shingle manufacturers, as a condition of their warranties, at valleys, around penetrations and along roof-to-wall transitions, and the FORTIFIED standard requires it as part of a sealed deck. A Texas roof without it at those places is not a code violation; it is a roof that will not carry the manufacturer's warranty and will not hold up as well.
My roofer wants to caulk the chimney flashing. Is that a fix?
It is a delay. Sealant at the top edge of properly set counter flashing is normal maintenance. Sealant used to hold surface-mounted flashing against brick, or smeared across a lap that was done in the wrong order, will fail within a few Texas summers and the leak will return. The lasting fix cuts the counter flashing into the mortar joint and rebuilds the lap.
How often should pipe boots be checked?
Every few years after the eighth year of the roof, and after any hail event. The rubber collar is the part that fails, it cracks in sunlight on a roughly ten-year schedule, and replacing a boot is a small repair when it is caught before the ceiling shows it.
Still have a question about your roof?
Get a straight answer and your real options, no obligation, never a hard sell. Most messages get a same-day reply, often within the hour.
Prefer a person? Call or text 512-575-5052, 8am to 9pm, seven days a week.
Get Help Ask Shepherd AIKeep Learning
Where to go from here
Each guide below picks up a thread from this page: what the layers cost, what storms do to them, and how to hire the person who touches them.